


Can You Clean Makeup Brushes in an Ultrasonic Cleaner? A Complete Guide
Browse Volume:48 Classify:Support
Makeup brushes accumulate oils, bacteria, dead skin cells, and product residue with every use. If you’ve ever spent twenty minutes swirling brushes in your palm with soap, watching the water turn murky for the third rinse cycle, you’ve probably wondered if there’s a better way. Ultrasonic cleaners promise deep cleaning through high-frequency sound waves, but can they handle the delicate bristles of your favorite makeup brushes without causing damage?
The short answer is yes, but with important caveats. Ultrasonic cleaners can effectively clean many types of makeup brushes when used correctly. However, success depends on understanding which brushes are compatible with this technology, what settings to use, and how to avoid common pitfalls that could ruin your expensive brush collection.
Understanding Ultrasonic Cleaning Technology
Before diving into whether you should use an ultrasonic cleaner for your makeup brushes, it helps to understand what these devices actually do.
How Ultrasonic Cleaners Work
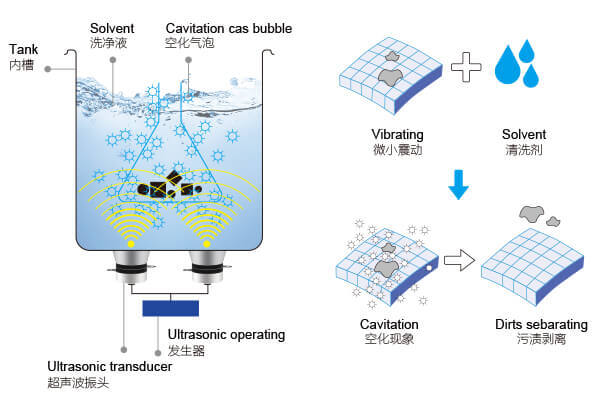
Ultrasonic cleaners operate through a process called cavitation. The device generates high-frequency sound waves, typically between 20 kHz and 40 kHz, which create millions of microscopic bubbles in the cleaning solution. These bubbles form and collapse rapidly, producing tiny jets of liquid that penetrate crevices and dislodge contaminants from surfaces.
The Principle Behind Ultrasonic Cleaning
The process happens thousands of times per second, creating a scrubbing action that reaches areas traditional cleaning methods can’t touch. For jewelry, eyeglasses, and dental instruments, this technology has proven remarkably effective. The question becomes whether this same aggressive cleaning action is appropriate for something as delicate as makeup brush bristles.
The tank of an ultrasonic cleaner typically holds water mixed with a cleaning solution. The transducer at the bottom of the tank converts electrical energy into ultrasonic waves. These waves travel through the liquid, creating the cavitation bubbles that do the actual cleaning work. Most consumer-grade ultrasonic cleaners offer adjustable time settings, usually ranging from one to thirty minutes, and some include temperature controls.
What Makes Ultrasonic Cleaning Different
Traditional makeup brush cleaning relies on mechanical agitation. You work soap into the bristles, swirl them against your palm or a textured mat, and rinse repeatedly. This method works but requires significant time and physical effort, especially when cleaning multiple brushes.
Ultrasonic cleaning takes a hands-off approach. Once you place your brushes in the tank, the cavitation process does the work. The microscopic bubbles penetrate deep into the bristle bed, reaching the base where product buildup tends to accumulate. This area near the ferrule, where bristles attach to the handle, is notoriously difficult to clean manually.
The efficiency factor matters too. While manually cleaning a full set of brushes might take thirty to forty minutes, an ultrasonic cleaner can handle the same job in five to ten minutes. For professional makeup artists who clean brushes daily, or beauty enthusiasts with large collections, this time savings adds up significantly.
The Case for Ultrasonic Makeup Brush Cleaning
Understanding why someone might choose ultrasonic cleaning over traditional methods helps frame the discussion about whether it’s appropriate.
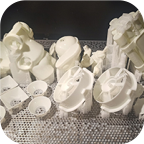
Makeup brushes being cleaned by an ultrasonic cleaner
Why Traditional Cleaning Methods Fall Short
Manual brush cleaning, while effective, has several limitations. First, it’s time-intensive. Each brush requires individual attention, working the cleanser through the bristles, rinsing thoroughly, and repeating until the water runs clear. For someone with twenty or thirty brushes, this becomes a significant time commitment.
Second, manual cleaning often misses the deepest contamination. Product buildup accumulates at the base of bristles, near where they’re glued into the ferrule. Your fingers can only reach so far into the bristle bed. Over time, this buildup can cause bristles to splay, lose their shape, or harbor bacteria that cause skin breakouts.
Third, aggressive manual cleaning can damage brushes. Pressing too hard, using water that’s too hot, or scrubbing vigorously can loosen bristles from the ferrule, damage the glue bond, or break individual hairs. Many people inadvertently shorten their brushes’ lifespan through overly enthusiastic cleaning.
Research from dermatology studies shows that inadequately cleaned makeup brushes can harbor harmful bacteria including Staphylococcus, E. coli, and fungal species. A 2019 study published in the Journal of Applied Microbiology found that 72% of tested makeup brushes contained bacterial contamination that could cause skin infections. Deep cleaning that reaches the bristle base becomes not just a preference but a health necessity.
Benefits of Ultrasonic Cleaning for Makeup Brushes
Ultrasonic cleaning addresses many of manual cleaning’s shortcomings. The cavitation process reaches deep into bristle beds, dislodging buildup that manual methods miss. The cleaning action is gentler than hand scrubbing because it doesn’t involve physical friction against the bristles. Instead, the microscopic bubbles do the work without pulling or stressing the hairs.
The consistency of ultrasonic cleaning is another advantage. Every brush receives the same thorough treatment. There’s no risk of rushing through the last few brushes because your hands are tired or you’re running late. The machine delivers uniform cleaning regardless of how many brushes you process at once, assuming you don’t overcrowd the tank.
For synthetic brushes in particular, ultrasonic cleaning excels. Synthetic fibers are durable and can withstand the cavitation process without damage. These brushes often accumulate stubborn liquid products like foundation and concealer, which ultrasonic cleaning removes more effectively than hand washing.
The time efficiency benefit cannot be overstated. Professional makeup artists who might clean brushes between clients, or beauty enthusiasts who prefer to clean brushes after each use rather than letting them accumulate, find ultrasonic cleaning practical where manual cleaning might feel burdensome enough to skip.
Can Ultrasonic Cleaners Actually Clean Makeup Brushes?
The practical question remains whether ultrasonic cleaners effectively clean makeup brushes without causing damage.
The Science Behind It
From a pure cleaning perspective, ultrasonic cleaners should work excellently on makeup brushes. The cavitation bubbles are small enough to penetrate between individual bristles and reach the ferrule base. Studies on ultrasonic cleaning in other contexts, such as dental instruments and surgical tools, demonstrate its ability to remove organic material and bacteria from complex surfaces.
Makeup residue consists primarily of oils, waxes, pigments, and preservatives. These substances respond well to ultrasonic cleaning when paired with appropriate cleaning solutions. The mechanical action of cavitation breaks the bonds between these residues and the brush fibers, while the cleaning solution dissolves and suspends the loosened particles.
The concern is whether this effective cleaning comes at a cost to brush integrity. Bristles, whether natural hair or synthetic fiber, have a specific structure. Natural hair has a cuticle layer that can be damaged by harsh treatment. Synthetic fibers, while more durable, can still be stressed by aggressive cleaning.
The ultrasonic cleaning process, when properly controlled, should not damage brushes. The cavitation bubbles are microscopic. The force they generate is significant at the microscopic scale but minimal at the macroscopic level. This means they can dislodge particles without pulling bristles or stressing the glue bond in the ferrule.
However, factors like water temperature, cleaning duration, and solution chemistry matter enormously. Water that’s too hot can soften glues and damage natural hair cuticles. Cleaning cycles that run too long expose brushes to unnecessary stress. Harsh chemical solutions can dry out natural hair or degrade synthetic fibers.

Click to View: Granbo GA013GB Household Ultrasonic Cleaner
What Professional Makeup Artists Say
Professional makeup artists have varying opinions on ultrasonic brush cleaning, with perspectives often depending on brush types and specific cleaning settings.
Many professionals in the industry have found ultrasonic cleaning effective for synthetic brushes and stubborn cream products, though they typically use short cleaning cycles and room-temperature water. For natural hair brushes, particularly expensive sable and squirrel varieties, traditional hand washing remains the preferred method for better control.
Makeup artists working in film and television, where sanitation is critical and time is limited, have increasingly adopted ultrasonic cleaning as part of comprehensive brush maintenance routines. Industry consensus suggests ultrasonic cleaning works best as one component of brush care rather than a complete replacement for traditional methods.
Most professionals recommend ultrasonic cleaning primarily for synthetic brushes and periodic deep cleaning rather than daily maintenance. Many also suggest following ultrasonic cleaning with a conditioning step to maintain bristle softness and alignment.
Which Makeup Brushes Are Safe for Ultrasonic Cleaning?
Not all makeup brushes are created equal when it comes to ultrasonic cleaning compatibility.
Natural Hair Brushes vs. Synthetic Brushes
Synthetic brushes are generally the safest choice for ultrasonic cleaning. These brushes use nylon, taklon, or other manufactured fibers that are durable and resistant to the cavitation process. Synthetic brushes handle liquid products like foundation, concealer, and cream blush, making them prone to heavy buildup that ultrasonic cleaning addresses effectively.
The durability of synthetic fibers means they can withstand multiple ultrasonic cleaning cycles without degradation. The fibers don’t have a delicate cuticle structure like natural hair, so they’re less susceptible to damage from the mechanical action. Most synthetic brushes also use strong adhesives in the ferrule that can handle the ultrasonic process without loosening.
Natural hair brushes require more caution. Brushes made from goat, squirrel, sable, pony, or other animal hairs have a more delicate structure. Natural hair has a cuticle layer, similar to human hair, that can be damaged by harsh treatment. High-quality natural hair brushes are also expensive, making the risk of damage more consequential.
That said, many natural hair brushes can be safely cleaned ultrasonically with proper precautions. The key factors are using cool or room-temperature water, limiting cleaning time to three to five minutes, and using a gentle cleaning solution. Natural hair brushes used with powder products, like blush or eyeshadow brushes, tend to fare better than those used with creams or liquids.
Some specific natural hair types are more resilient than others. Goat hair, commonly used in powder brushes, is relatively sturdy. Squirrel and sable, used in high-end brushes for their softness, are more delicate and benefit from hand washing. If you do use ultrasonic cleaning on premium natural hair brushes, consider it an occasional deep clean rather than a regular routine.
Handle Materials That Matter
The brush handle and ferrule materials influence whether ultrasonic cleaning is appropriate. Most modern makeup brushes use aluminum or brass ferrules with wooden, plastic, or acrylic handles. These materials generally tolerate ultrasonic cleaning well.
Wood handles deserve special attention. If water penetrates the wood, it can cause swelling, warping, or cracking. When cleaning brushes with wooden handles ultrasonically, keep the handles above the water line. Some users employ brush holders or racks that suspend brushes in the tank with only the bristles and ferrule submerged. This approach works well but requires appropriate equipment.
Plastic and acrylic handles are ultrasonic-friendly. These materials are waterproof and won’t be damaged by the cleaning process. Brushes with these handles can be fully submerged if needed, though it’s still best practice to keep handles out of the solution when possible to avoid any unnecessary exposure.
Metal ferrules (the metal part that holds the bristles) are designed to be water-resistant, but the glue inside can be vulnerable. High-quality brushes use water-resistant adhesives, but cheaper brushes may use glues that soften with prolonged water exposure. Limiting ultrasonic cleaning time helps protect the ferrule bond regardless of brush quality.
Vintage or antique brushes with mother-of-pearl, ivory, or other decorative handle materials should not be ultrasonically cleaned. These materials can be damaged by prolonged water exposure or vibration. Such brushes are better served by careful hand washing.
Step-by-Step Guide to Cleaning Makeup Brushes in an Ultrasonic Cleaner
If you’ve decided to try ultrasonic cleaning for your makeup brushes, following the correct process ensures the best results while minimizing risks.
Preparing Your Brushes
Start by giving your brushes a preliminary rinse under lukewarm running water. Hold each brush with the bristles pointing downward to prevent water from seeping into the ferrule. This initial rinse removes the bulk of loose makeup and prevents the ultrasonic cleaner’s solution from becoming overly contaminated during the first batch.
Gently squeeze excess water from the bristles without twisting or pulling. For brushes with heavy product buildup, you might consider a quick manual pre-wash with a gentle soap. This step isn’t always necessary, but it can help the ultrasonic cleaning process work more efficiently, especially for cream or liquid products that have dried on the bristles.
Inspect each brush before ultrasonic cleaning. Look for loose ferrules, bristles that are already shedding excessively, or damaged handles. Brushes with existing structural problems may not survive ultrasonic cleaning and should be set aside for hand washing or replacement.
Group brushes by type and size. You’ll get better results cleaning similar brushes together. Small eye brushes might need a shorter cleaning cycle than large powder brushes. Keeping similar brushes together also prevents larger brushes from crushing smaller ones in the tank.
Choosing the Right Cleaning Solution
The solution you use in the ultrasonic cleaner significantly impacts both cleaning effectiveness and brush safety.
Brush-specific cleaners designed for ultrasonic use are available from professional beauty supply companies. These solutions are formulated to dissolve makeup residues while being gentle on brush fibers. They typically contain surfactants that break down oils and pigments, along with conditioning agents that protect bristles.
Gentle dish soap works as a budget-friendly alternative. Choose a mild, clear formula without added moisturizers or harsh degreasers. Baby shampoo is another good option, particularly for natural hair brushes. Mix just a small amount with water. The solution should be slightly soapy, not thick with suds. A ratio of one teaspoon of soap per cup of water typically works well.
Specialized makeup brush cleansers that you’d normally use for hand washing can also be added to the ultrasonic tank. These products are already formulated for brush safety. Use them at a similar dilution to hand washing, perhaps slightly weaker since the ultrasonic action enhances cleaning power.
Avoid harsh chemicals, alcohol-based solutions, or anything with strong solvents. These can damage natural hair, dry out synthetic fibers, or weaken the glue in ferrules. The ultrasonic action provides enough cleaning power that aggressive chemicals aren’t necessary.
The water temperature matters as much as the solution itself. Room temperature to slightly warm water (never exceeding 85°F or 30°C) is safest. Hot water can soften adhesives, damage natural hair cuticles, and cause handle materials to expand and contract, potentially leading to cracks.
Setting Up Your Ultrasonic Cleaner
Fill the ultrasonic cleaner’s tank with your prepared cleaning solution. Don’t overfill. Leave enough space that adding your brushes won’t cause overflow. Most ultrasonic cleaners have a fill line indicating the maximum safe level.
If your ultrasonic cleaner has a basket or tray, use it. This keeps brushes from resting directly against the transducer at the tank’s bottom, which can cause uneven cleaning or excessive vibration stress. Some users purchase or create custom brush holders that suspend brushes with only the bristles submerged, keeping handles dry.
Position brushes in the tank so they’re not tightly packed. Brushes need space for the cleaning solution to circulate around them. Overcrowding reduces cleaning effectiveness and can cause bristles to become tangled or matted. If you have many brushes to clean, work in batches rather than trying to fit everything in at once.
Orient brushes with bristles pointing downward or at an angle. This prevents water from traveling up into the ferrule and handle. Some users lay brushes horizontally if the tank size allows, which also works well.
Check that no brush handles or other parts are touching the tank’s sides or bottom directly. Contact with the tank surfaces can cause rattling or excessive vibration that might damage brushes.
The Cleaning Process
Set your ultrasonic cleaner for a short initial cycle. Three to five minutes is sufficient for most makeup brushes. Synthetic brushes can handle up to ten minutes if needed for stubborn buildup, but start conservatively.
Start the cleaning cycle and observe the process for the first minute. You should see the solution becoming cloudy as makeup dissolves from the brushes. This visual feedback confirms the cleaning is working. You might also notice slight movement of the brushes in the tank as the cavitation bubbles create micro-currents in the liquid.
Don’t be alarmed if the brushes vibrate slightly. This is normal and part of the cleaning process. However, if brushes are jumping vigorously or rattling loudly against the tank, stop the cycle. This indicates either overcrowding or incorrect positioning.
For particularly dirty brushes, you might consider running two short cycles with fresh solution rather than one long cycle. After the first cycle, rinse the brushes under running water, refresh the cleaning solution in the tank, and run a second brief cycle. This approach is gentler than extended continuous cleaning.
Some ultrasonic cleaners offer frequency or power settings. If yours does, use a gentler setting for makeup brushes. The highest power setting is designed for jewelry and metal objects that can handle more aggressive cleaning. Brushes don’t need maximum power to get clean.
Temperature control, if available, should be set to room temperature or slightly warm (around 80°F or 27°C maximum). Never use the heating function on high for makeup brushes.
Drying and Maintenance
Once the ultrasonic cleaning cycle completes, immediately remove brushes from the solution. Rinse each brush thoroughly under cool running water. Hold the brush with bristles pointing downward and gently squeeze the bristles while rinsing to flush out any remaining cleaning solution.
Check that the water runs completely clear. If you still see soap or residue, continue rinsing. Leaving cleaning solution in brushes can cause bristle stiffness and may irritate skin during future use.
Gently squeeze excess water from the bristles using your fingers. Don’t wring or twist the bristles, as this can cause damage or alter the brush shape. Some people gently press the bristles between a clean towel to remove additional moisture.
Reshape the bristles while they’re still damp. Gently manipulate them back into their intended shape. This step is particularly important for natural hair brushes, which can lose their form if left to dry haphazardly.
Lay brushes flat to dry on a clean towel, positioning them so the bristles extend off the edge of the counter. This allows air circulation around the bristles while keeping the ferrule and handle elevated, preventing water from seeping into the ferrule during the drying process.
Alternatively, use a brush drying rack that suspends brushes with bristles pointing downward. This is the ideal drying position as it prevents any residual moisture from traveling into the ferrule or handle. These racks are inexpensive and widely available from beauty supply retailers.
Never stand brushes upright in a container while drying. Water will flow down into the ferrule, potentially loosening the glue and causing bristles to shed.
Allow brushes to dry completely before using or storing them. This typically takes six to twelve hours depending on brush size and density. Larger, denser brushes may need overnight drying.
For natural hair brushes, consider applying a small amount of brush conditioning spray or oil after they’re completely dry. This step replaces natural oils that may have been stripped during cleaning and helps maintain bristle softness.
Common Mistakes to Avoid
Even when following proper procedures, certain mistakes can compromise results or damage brushes.
Temperature Errors
Using water that’s too hot is perhaps the most common and damaging mistake. Hot water serves no benefit in ultrasonic cleaning since the cavitation process doesn’t depend on temperature. Meanwhile, hot water can quickly soften ferrule adhesives, cause wooden handles to crack, and damage natural hair cuticles.
I learned this lesson personally when testing different water temperatures. After cleaning several brushes in water around 110°F (43°C), I noticed increased shedding in subsequent uses. Natural hair brushes showed particular sensitivity, with the bristles feeling rougher and less soft. Once I switched to room temperature water, these problems disappeared.
Some ultrasonic cleaners include heating elements intended for other cleaning applications. If your cleaner has this feature, either disable it or ensure it’s set to the lowest possible temperature. Room temperature (68-72°F or 20-22°C) works perfectly for makeup brush cleaning.
Cleaning Time Mistakes
Running ultrasonic cleaning cycles too long is another frequent error. The temptation exists to think that longer cleaning equals better results, but with makeup brushes, extended exposure to ultrasonic agitation can stress bristles unnecessarily.
Most makeup residue breaks down within the first three to five minutes of ultrasonic cleaning. Running a ten or fifteen-minute cycle doesn’t necessarily yield cleaner brushes, but it does expose them to additional mechanical stress. This is particularly problematic for natural hair brushes, where extended cleaning can roughen cuticles and cause increased shedding.
If brushes aren’t clean after a short cycle, the solution is usually to refresh the cleaning solution and run a second short cycle rather than extending the first cycle. This approach provides better cleaning with less stress on the brushes.
Conversely, running cycles that are too short may leave residue behind. While one or two minutes might seem safer, it doesn’t give the ultrasonic process enough time to work effectively. The sweet spot for most brushes is three to five minutes, which balances thorough cleaning with brush safety.
Solution Selection Problems
Using the wrong cleaning solution can negate the benefits of ultrasonic cleaning. Harsh chemicals, concentrated soaps, or inappropriate additives can all cause problems.
Alcohol-based solutions are particularly problematic. While alcohol is sometimes used in brush cleaners for its quick-drying properties and sanitizing effects, it can dry out both natural and synthetic bristles. In an ultrasonic cleaner, alcohol becomes even more aggressive due to the cavitation process enhancing its penetration into brush fibers.
Vinegar, despite its popularity as a natural cleaner, is too acidic for regular use on makeup brushes. It can damage natural hair and may affect some synthetic fibers over time. While diluted vinegar might work for occasional deep cleaning, it’s not ideal for regular ultrasonic cleaning.
Solutions that are too concentrated with soap create excessive suds. Ultrasonic cleaners don’t work well with heavy suds, which interfere with the cavitation process. The cleaning solution should be slightly soapy but not foamy.
Using plain water without any cleaning agent is also a mistake. Water alone doesn’t effectively dissolve oils and waxes from makeup products. The ultrasonic action can dislodge particles, but without a surfactant to suspend them in solution, they may simply redistribute on the brushes.
Alternatives and Complementary Cleaning Methods
Ultrasonic cleaning shouldn’t necessarily be your only approach to brush maintenance.
When Manual Cleaning Works Better
Quick daily cleaning between uses is better handled manually. If you use a brush for powder products and just need to remove color before switching shades, a quick swirl on a dry brush cleaning sponge or a spritz with brush cleaner and wipe on a towel is more efficient than setting up the ultrasonic cleaner.
Spot cleaning for light use also doesn’t require ultrasonic treatment. Many makeup enthusiasts do a light manual clean after each use and save deep cleaning, whether ultrasonic or traditional, for weekly or bi-weekly maintenance.
Extremely delicate vintage brushes or those with sentimental value might be better served by careful hand washing where you can control every aspect of the process. The peace of mind from gentle hand care might outweigh the convenience of ultrasonic cleaning for irreplaceable brushes.
Travel situations also favor manual cleaning. Unless you’re a professional makeup artist traveling with an ultrasonic cleaner, hand washing remains the practical choice when away from home.
Combining Methods for Best Results
Many makeup enthusiasts and professionals find that combining methods yields the best results. Here’s an approach that works well for comprehensive brush care.
Daily maintenance: Quick spot cleaning with brush cleaning spray and a microfiber cloth after each use. This prevents heavy buildup and extends time between deep cleans.
Weekly deep clean: Ultrasonic cleaning for synthetic brushes and brushes with heavy liquid product buildup. This removes the accumulated oils and residues that daily maintenance misses.
Monthly conditioning: Hand washing for natural hair brushes with a gentle cleanser, followed by conditioning treatment. This approach gives you complete control over the process while maintaining the softness and integrity of natural hair.
Quarterly assessment: Inspect all brushes for damage, loose ferrules, or excessive shedding. Replace or repair as needed. This prevents damaged brushes from deteriorating further during cleaning.
This combined approach leverages the strengths of each method while minimizing the weaknesses. Ultrasonic cleaning handles what it does best (deep cleaning of durable brushes), while hand washing addresses situations requiring more delicate care.