 Granbo Sonic











Do Ultrasonic Cleaners Remove Tarnish from Silver?
Browse Volume:15 Classify:Support
Yes, ultrasonic cleaners effectively remove tarnish from silver when paired with appropriate cleaning solutions. The combination of high-frequency sound waves generating cavitation bubbles and chemically active tarnish-removing solutions dissolves silver sulfide deposits that cause the characteristic black discoloration. However, ultrasonic cleaning with plain water alone produces minimal tarnish removal because cavitation primarily addresses physical contaminants rather than chemical tarnish compounds bonded to the silver surface.
The effectiveness depends entirely on using the correct cleaning solution chemistry. Silver-specific formulations containing thiourea, mild acids, or chelating agents convert silver sulfide back to metallic silver or dissolve it into soluble compounds. The ultrasonic action accelerates these chemical reactions by factors of 10 to 100 compared to simple soaking, reducing cleaning time from hours to just 3 to 10 minutes for most tarnished silver items.
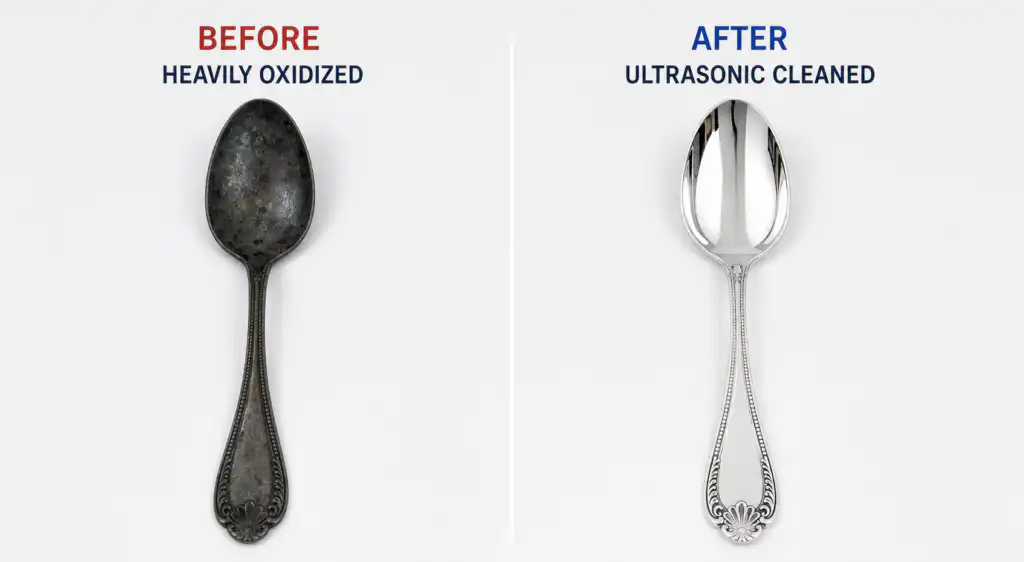
Results can be dramatic. Heavily tarnished silver pieces showing thick black coatings transform to bright, mirror-like finishes within minutes when proper technique and solutions are employed. Understanding the interaction between ultrasonic mechanics and silver tarnish chemistry enables reliable restoration across jewelry, flatware, decorative items, and collectibles.

The Science Behind Silver Tarnishing
Silver tarnish represents a specific chemical transformation fundamentally different from dirt or general oxidation.
What Creates Silver Tarnish
Silver reacts with sulfur-containing compounds present in air, creating the characteristic dark discoloration known as tarnish. This process occurs even in relatively clean environments because trace amounts of hydrogen sulfide and other sulfur compounds exist nearly everywhere.
Environmental sulfur sources include industrial emissions, volcanic gases, and natural decay of organic materials. Urban and industrial areas typically contain higher atmospheric sulfur concentrations, accelerating tarnish formation. Even rural environments contain sufficient sulfur for gradual silver tarnishing over time.
Household sources contribute significantly to silver tarnishing rates. Foods including eggs, onions, and fish release sulfur compounds during preparation and consumption. Wool, rubber, latex, and certain papers off-gas sulfur-containing volatiles. Storage in wooden boxes or drawers exposes silver to sulfur emissions from wood degradation.
Human contact introduces sulfur through skin oils and perspiration. Silver jewelry worn regularly often tarnishes faster in contact areas due to skin chemistry. Some individuals’ body chemistry promotes more rapid tarnishing than others based on sulfur content in perspiration.
The tarnish reaction proceeds without requiring elevated temperatures or special conditions. Room temperature and normal humidity suffice for silver sulfide formation, though higher humidity and temperature accelerate the process. This explains why silver stored in damp basements or hot attics tarnishes faster than climate-controlled storage.
Chemical Composition of Silver Sulfide
The tarnishing reaction follows straightforward chemistry. Silver atoms at the surface react with hydrogen sulfide or other sulfur compounds to form silver sulfide (Ag₂S).
The chemical equation 2Ag + H₂S → Ag₂S + H₂ shows that two silver atoms combine with one hydrogen sulfide molecule to create silver sulfide while releasing hydrogen gas. This reaction occurs spontaneously at room temperature without requiring energy input.
Silver sulfide appears black or dark brown, creating the discoloration associated with tarnished silver. The compound bonds chemically to the underlying silver surface rather than simply sitting on top as a loose deposit. This chemical bonding explains why tarnish cannot be wiped away like dust or dirt.
Tarnish layer thickness typically ranges from nanometers for light tarnish to several micrometers for heavily tarnished pieces neglected for years. Despite appearing thick and opaque, tarnish layers remain remarkably thin in absolute terms. A heavily tarnished piece showing completely black surface may have only 2 to 5 micrometers of silver sulfide.
The semi-transparent nature of thin silver sulfide layers creates the progression of tarnish colors. Initial tarnishing appears golden or straw-colored as thin silver sulfide films create interference colors. Progressive thickening produces purple, blue, then black appearance as the layer becomes optically opaque.
Silverware Comparison Image
Why Silver Tarnishes Faster Than Other Metals
Silver’s chemical reactivity with sulfur exceeds most other common metals, making it particularly prone to tarnishing.
Gold and platinum resist tarnishing completely under normal conditions because these noble metals don’t react with sulfur compounds. Pure gold remains bright indefinitely regardless of atmospheric exposure. This fundamental difference explains why gold jewelry requires only periodic cleaning for dirt while silver demands regular tarnish removal.
Copper tarnishes through different chemistry, primarily forming copper oxide (brown or black) and copper carbonate (green patina) rather than sulfides. While copper also discolors, the chemical composition and appearance differ from silver tarnish.
Sterling silver (92.5% silver, 7.5% copper) tarnishes slightly differently than pure silver because the copper content contributes additional tarnish compounds. The copper component may create reddish or yellowish tarnish tones alongside the black silver sulfide. However, the silver sulfide formation dominates the tarnishing process in sterling silver.
The thermodynamic favorability of silver sulfide formation drives rapid tarnishing. The reaction releases energy, making it spontaneous and difficult to prevent without complete isolation from atmospheric sulfur. Even anti-tarnish treatments only slow the process rather than eliminating it completely.
How Ultrasonic Technology Works on Tarnished Silver
Ultrasonic tarnish removal relies on the synergistic combination of physical cavitation and chemical dissolution.
The Principle Behind Ultrasonic Cleaning
Cavitation Bubble Formation and Collapse
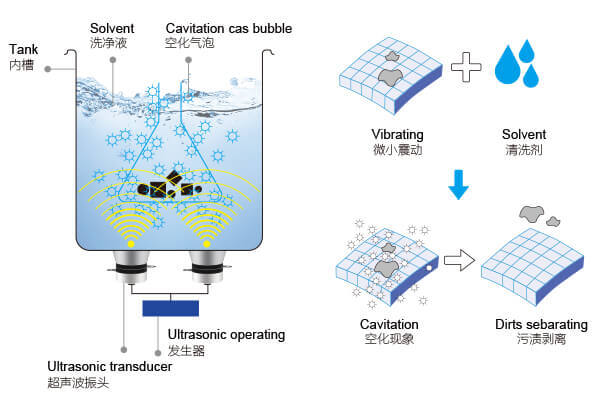
Ultrasonic transducers bonded to cleaning tank bottoms or sides convert electrical energy into mechanical vibrations at frequencies typically between 35 kHz and 50 kHz. These vibrations propagate through the cleaning liquid as pressure waves.
Alternating pressure zones create the foundation for cavitation. During low-pressure phases of the sound wave, microscopic bubbles form throughout the liquid. These cavitation bubbles start as nanometer-scale nuclei and grow during subsequent pressure cycles.
When bubbles reach critical size, usually 10 to 100 micrometers in diameter, they become unstable. During high-pressure phases, the bubbles violently implode. This collapse occurs within microseconds and generates extraordinary localized conditions.
Implosion effects include temperatures momentarily exceeding 5,000 degrees Celsius at the collapse point and pressures reaching hundreds of atmospheres. Liquid microjets form, shooting toward nearby surfaces at velocities over 100 meters per second. These extreme conditions occur at microscopic scales for microsecond durations, creating intense localized effects without damaging bulk materials.
Millions of cavitation events occur throughout the cleaning solution every second. Each bubble collapse creates a microscopic impact against tarnished silver surfaces. The cumulative effect produces continuous, aggressive cleaning action reaching into every crevice, under decorative elements, and across irregular surfaces.
Surface effects on silver include mechanical disruption of tarnish layers, creation of microscopic cracks in silver sulfide films, and continuous solution refreshment against tarnished areas. The cavitation doesn’t directly remove tarnish through mechanical force alone but prepares surfaces for chemical action and accelerates chemical reaction rates.
The Synergy Between Ultrasonic Waves and Chemical Solutions
Chemical dissolution performs the actual tarnish removal while ultrasonic energy dramatically accelerates the process.
Chemical reaction rates depend on several factors including solution concentration, temperature, and contact between reactive species and tarnish. Traditional chemical cleaning relies on diffusion to bring fresh solution to surfaces and remove reaction products. This diffusion-limited process proceeds slowly.
Ultrasonic cavitation eliminates diffusion limitations. The intense mixing and microstreaming flows continuously circulate solution and prevent depletion zones where reactions slow. Fresh active chemistry constantly contacts tarnished surfaces while dissolved silver sulfide compounds immediately disperse into bulk solution.
Mass transfer enhancement from ultrasonic action accelerates reactions by factors of 10 to 100. Reactions that require hours of static soaking complete in minutes with ultrasonic assistance. This acceleration occurs without requiring stronger chemicals or higher temperatures that might damage silver.
The cavitation also disrupts the boundary layer, a thin film of liquid that normally clings to submerged surfaces and resists mixing. This boundary layer typically limits reaction rates because reactants must diffuse through stagnant liquid. Ultrasonic disruption eliminates this barrier.
Penetration into complex geometries represents another key advantage. Silver pieces often feature intricate engraving, filigree work, chains, or assembled components creating crevices and recesses. Manual cleaning struggles to reach these areas. Ultrasonic cavitation occurs throughout the liquid volume, treating all submerged surfaces uniformly regardless of geometry complexity.
Why Water Alone Is Insufficient
Plain water ultrasonic cleaning removes dirt, oils, and loose particles effectively but fails to address chemically bonded tarnish.
Silver sulfide chemistry requires specific reactive agents for dissolution. Water itself doesn’t react with silver sulfide under normal conditions. The compound remains stable in water indefinitely without dissolving or converting to other forms.
Testing plain water ultrasonic cleaning on tarnished silver demonstrates this limitation clearly. After 10 to 15 minutes of intense ultrasonic exposure in plain water, tarnished silver shows minimal improvement. Surface dirt may be removed, but the black silver sulfide tarnish remains essentially intact.
Chemical reactivity requirements mean the cleaning solution must contain acids, reducing agents, chelators, or other active species that react with silver sulfide. These chemicals convert the tarnish to soluble forms that dissolve into solution or reduce it back to metallic silver.
Common effective chemistries include thiourea (reduction chemistry), mild acids like citric or acetic acid (dissolution chemistry), and chelating agents including EDTA (complexation chemistry). Each approach uses different reaction mechanisms but all provide the chemical activity absent in plain water.
The combination of these active chemicals with ultrasonic enhancement creates the synergy necessary for rapid, complete tarnish removal. Neither component alone achieves results matching their combined effectiveness.
Essential Cleaning Solutions for Silver Tarnish Removal
Solution chemistry determines tarnish removal success more than ultrasonic power or any other factor.
Thiourea-Based Formulations
Thiourea-based silver cleaners represent the most effective formulations specifically designed for silver sulfide tarnish.
Thiourea chemistry works through reduction, converting silver sulfide back to metallic silver. The thiourea molecule donates electrons to silver ions in the sulfide compound, reducing them to elemental silver atoms. The sulfur component forms soluble sulfur compounds that disperse into solution.
Chemical equation: Ag₂S + thiourea → 2Ag + soluble sulfur compounds
This reduction mechanism offers several advantages. The reaction specifically targets silver sulfide without attacking the underlying silver metal aggressively. Results include bright, natural-looking silver surface finishes rather than the flat appearance sometimes produced by acid cleaners.
Commercial thiourea formulations typically contain 1% to 3% thiourea along with sulfuric acid or other acids to optimize reaction rates. The acid maintains appropriate pH for efficient thiourea activity. Surfactants improve wetting and solution spreading across silver surfaces.
Application in ultrasonic cleaners involves diluting concentrated thiourea products according to manufacturer specifications, typically 1:10 to 1:20 ratios. The ultrasonic action accelerates the reduction reaction dramatically. Silver pieces showing heavy tarnish often transform to bright finish within 3 to 5 minutes.
Temperature effects significantly influence thiourea cleaning rates. Room temperature solutions work but slowly. Heating to 50 to 60 degrees Celsius accelerates reactions substantially, reducing cleaning time by half or more. Most ultrasonic cleaners include heating capability specifically for this purpose.
Safety considerations include adequate ventilation because thiourea formulations may release sulfur dioxide during use. Gloves protect hands from prolonged exposure. Despite these precautions, thiourea cleaners remain much safer than many industrial cleaning chemicals.
Mild Acid Solutions for Silver
Acid-based cleaners dissolve silver sulfide through different chemistry than reduction methods.
Citric acid provides gentle yet effective tarnish removal through acidic dissolution. Concentrations between 5% and 15% dissolve silver sulfide at practical rates when enhanced by ultrasonic action. The organic acid produces soluble silver citrate and releases hydrogen sulfide gas (which disperses from open cleaners).
Citric acid benefits include low toxicity, food-grade availability, biodegradability, and minimal silver base metal attack when used at appropriate concentrations and times. The mild nature makes citric formulations suitable for delicate silver items or pieces with gemstone settings requiring gentler chemistry.
Acetic acid based on vinegar chemistry offers similar performance. Commercial formulations use buffered acetic acid at 5% to 10% concentration combined with surfactants and sometimes chelating agents. The buffering maintains consistent pH as the acid consumes itself during tarnish dissolution.
Phosphoric acid appears in some commercial silver cleaners, often at 1% to 3% concentration. This acid dissolves tarnish while forming a temporary phosphate coating that can inhibit immediate re-tarnishing. The protective effect remains temporary but extends bright appearance longer than unprotected cleaned silver.
Acid cleaning produces soluble silver salts that dissolve into solution. These dissolved silver compounds require thorough rinsing after cleaning to prevent residue formation as the solution dries. Inadequate rinsing may leave spots or haze that dull appearance.
Commercial vs DIY Cleaning Solutions
Purpose-formulated commercial products optimize multiple performance factors simultaneously.
Commercial silver cleaners combine active ingredients with surfactants for improved wetting, chelators to prevent redeposition, corrosion inhibitors to protect silver, brighteners for enhanced luster, and pH buffers for consistent performance. This multi-component formulation achieves results difficult to match with simple single-chemical DIY solutions.
Quality commercial products undergo testing on diverse silver types including sterling, fine silver, and silver plate. The formulations balance aggressive tarnish removal with silver protection, ensuring effective cleaning without damage. Concentration recommendations and usage instructions reflect this optimization.
DIY solutions using household chemicals like vinegar, lemon juice, or baking soda provide basic tarnish removal capability at minimal cost. However, these simple formulations lack the optimization of commercial products. Results may be inconsistent, cleaning times longer, and risks of silver damage higher without proper formulation knowledge.
Popular DIY aluminum foil methods rely on electrochemical reduction rather than chemical dissolution. While functional, these methods produce less consistent results than controlled ultrasonic cleaning with proper solutions. The appearance may lack the brilliance achieved through optimized commercial formulations.
Cost considerations favor commercial products for valuable silver despite higher per-use costs. The optimized chemistry, consistent results, and reduced damage risks justify the expense when cleaning precious items. DIY solutions suit less valuable pieces where optimal results matter less than cleaning cost.
pH Considerations and Silver Safety
Solution pH affects both tarnish removal effectiveness and silver safety.
Acidic pH between 2 and 4 provides optimal tarnish dissolution rates. This pH range offers sufficient acidity to dissolve silver sulfide rapidly while minimizing aggressive attack on metallic silver itself. Solutions significantly more acidic risk excessive silver dissolution along with tarnish removal.
Neutral pH solutions around 7 show minimal tarnish removal capability. Without acidic or reducing chemistry, neutral solutions cannot dissolve or convert silver sulfide effectively. Neutral cleaners work well for removing dirt from silver but fail against actual tarnish.
Alkaline pH above 8 provides little benefit for silver tarnish removal. While alkaline solutions excel at degreasing and removing organic soils, they don’t address silver sulfide chemistry effectively. Some specialized formulations use alkaline pH for specific purposes but these remain uncommon for general tarnish removal.
pH monitoring during use helps maintain effectiveness. As cleaning solutions process multiple tarnished items, the acid content depletes through reaction with tarnish. The pH rises toward neutral, reducing effectiveness. Testing pH periodically and refreshing solution when it drifts above target range maintains consistent performance.
Silver tolerates acidic pH reasonably well when exposure time remains controlled. The key involves balancing sufficient acidity for tarnish removal against minimizing silver base metal dissolution. Properly formulated commercial cleaners achieve this balance through tested formulations and recommended usage times.
Step-by-Step Process for Removing Silver Tarnish
Systematic technique maximizes tarnish removal while protecting silver items.
Pre-Cleaning Assessment and Preparation
Inspecting silver items before ultrasonic cleaning prevents damage and identifies special handling requirements.
Structural integrity check identifies loose elements, damaged areas, or weak points. Silver pieces showing cracks, loose settings, or previous repairs require careful evaluation. Ultrasonic vibration can worsen existing damage or dislodge poorly attached components.
Gemstone identification determines cleaning compatibility. While many stones tolerate ultrasonic cleaning well, emeralds, opals, pearls, tanzanite, and certain treated stones risk damage. Items containing incompatible stones require alternative cleaning methods or professional treatment.
Silver plate versus solid silver assessment guides parameter selection. Silver-plated items need gentler treatment than solid silver pieces. Excessive chemical exposure or prolonged ultrasonic cleaning can damage thin plating, exposing base metal beneath.
Antique silver deserves special consideration regarding patina preservation. Some antique pieces have developed desirable aged character that collectors value. Aggressive cleaning removes this patina along with tarnish. Determining whether full restoration or gentle cleaning preserving some age character is desired guides approach selection.
Initial loose soil removal through gentle brushing or rinsing eliminates debris that would contaminate cleaning solution unnecessarily. Removing major dirt before ultrasonic treatment extends solution life and improves tarnish removal efficiency.
Optimal Temperature Settings
Temperature dramatically affects chemical tarnish removal rates and should be optimized for efficient cleaning.
Room temperature (20 to 25 degrees Celsius) cleaning works but requires significantly extended time. Tarnish removal reactions proceed slowly in cold solutions. Items that clean in 5 minutes at 60 degrees might need 30 minutes or longer at room temperature.
Recommended operating temperature ranges from 50 to 65 degrees Celsius for most silver cleaning applications. This temperature range provides rapid reaction rates without excessive evaporation, chemical degradation, or risk to heat-sensitive components.
Most ultrasonic cleaners with heating capability target 60 degrees Celsius as the standard setting. This temperature represents an optimized balance between cleaning speed and operational considerations. Heating solution before introducing silver items ensures consistent, efficient cleaning from the start.
Temperature limitations apply when silver pieces incorporate heat-sensitive materials. Adhesive-set stones, enamel work, or assembled components joined with low-temperature solders may be damaged by elevated temperatures. These items require room-temperature cleaning despite slower performance.
Temperature monitoring using built-in heater controls or external thermometers maintains target conditions. Solution temperature tends to decrease as cooler items are introduced, particularly when cleaning larger batches. Allowing temperature recovery between batches maintains consistent results.
Recommended Cleaning Duration
Exposure time must be sufficient for complete tarnish removal without excessive treatment.
Light tarnish showing slight yellowing or early discoloration typically requires 2 to 5 minutes of ultrasonic cleaning with appropriate solutions. Visual monitoring allows stopping when desired brightness appears. Extending cleaning beyond necessary completion provides no benefit and potentially risks damage to delicate items or thin plating.
Moderate tarnish displaying brown to dark brown discoloration generally needs 5 to 10 minutes for complete removal. The tarnish thickness and density determine exact time requirements. Periodic visual inspection guides optimal stopping point.
Heavy tarnish with thick black coatings demands 10 to 20 minutes for thorough restoration. Very heavily tarnished pieces neglected for years or decades may require multiple cleaning cycles with solution refreshment between treatments.
Progress monitoring through periodic visual checks prevents both under-cleaning and over-treatment. Removing items every 2 to 3 minutes to assess progress allows stopping at optimal points. Most tarnish removal occurs progressively rather than suddenly.
Items showing incomplete tarnish removal after initial cleaning benefit from solution refreshment and additional cycles rather than single extended cleaning. Fresh solution provides renewed chemical activity when initial solution becomes depleted.
Post-Cleaning Treatment
Proper finishing steps maximize appearance and prevent immediate re-tarnishing.
Immediate thorough rinsing in clean water removes residual cleaning solution and dissolved tarnish products. Incomplete rinsing allows solution residues to dry onto cleaned silver, potentially creating spots or haze. Running water rinsing for 30 to 60 seconds ensures adequate residue removal.
Distilled water final rinse prevents water spots from mineral deposits in tap water. Hard water contains calcium and magnesium that leave visible spots as water evaporates. A brief final rinse in distilled water eliminates this problem.
Complete drying prevents water spots and immediate tarnish formation. Compressed air accelerates drying in crevices and detailed areas. Soft lint-free cloths gently dry surfaces without scratching. Some ultrasonic cleaning facilities use warm air dryers for rapid, complete drying.
Optional anti-tarnish treatment application slows re-tarnishing and extends bright appearance. Commercial anti-tarnish solutions leave molecular films that exclude atmospheric sulfur and moisture. These protective treatments maintain cleaned appearance for months rather than weeks.
Proper storage immediately after cleaning and protection preserves restoration results and minimizes maintenance frequency.
Different Types of Silver and Their Response
Silver composition and construction affect ultrasonic cleaning approach and results.
Pure Silver vs Sterling Silver
Fine silver and sterling silver respond similarly to ultrasonic tarnish removal but show subtle differences.
Fine silver (99.9% pure) tarnishes to form nearly pure silver sulfide. The absence of other metals simplifies tarnish chemistry. Cleaning removes black silver sulfide, revealing bright white silver beneath. Fine silver items typically show dramatic transformation from completely black to brilliant white.
Pure silver’s softness makes it susceptible to scratching and deformation but doesn’t affect ultrasonic cleaning safety. The gentle chemical and mechanical action of proper ultrasonic cleaning doesn’t damage fine silver structurally.
Sterling silver (92.5% silver, 7.5% copper) includes copper that contributes additional tarnish complexity. The copper component forms copper sulfide alongside silver sulfide, sometimes creating reddish or pinkish tarnish tones. Mixed tarnish chemistry requires formulations addressing both silver and copper compounds.
Quality commercial silver cleaners account for sterling composition and effectively remove both silver and copper tarnish components. Results match fine silver cleaning, restoring bright characteristic sterling appearance.
Color differences between fine and sterling silver become apparent after cleaning. Fine silver shows brilliant white coloration. Sterling appears slightly warmer or creamier due to copper content. Both achieve full brightness through proper ultrasonic tarnish removal.
Silver-Plated Items and Special Precautions
Silver plate demands more conservative cleaning parameters than solid silver pieces.
Plating thickness typically ranges from 0.5 to 10 micrometers for electroplated silver. This thin layer over base metals including copper, brass, or nickel-silver provides silver appearance at reduced cost. The minimal thickness requires protective treatment during cleaning.
Aggressive cleaning solutions or excessive exposure time can remove plating along with tarnish. Once base metal exposure occurs, the item appears damaged with copper or brass showing through. This damage cannot be reversed through cleaning.
Gentler chemistry recommendations for silver plate include reduced acid concentration, shorter cleaning times, and lower temperatures. Diluting commercial cleaners beyond standard recommendations provides additional safety margin. Cleaning times should be limited to 3 to 5 minutes with frequent monitoring.
Visual monitoring becomes critical when cleaning silver plate. Stopping immediately when tarnish disappears prevents over-cleaning. Unlike solid silver where extended cleaning causes no harm, silver plate can be damaged by unnecessary continued exposure.
Antique silver plate often shows wear from years of use and previous cleaning. Thin or worn plating areas require extra caution. Some antique plated items may be too compromised for ultrasonic cleaning and require alternative gentle hand cleaning methods.
Antique Silver Considerations
Historical silver pieces deserve special evaluation regarding cleaning approach and extent.
Patina preservation represents a key consideration for antique silver. Some collectors and museums value aged appearance that includes slight tarnish, wear marks, and surface character developed over decades or centuries. Aggressive restoration removing all tarnish may actually reduce historical value.
Determining appropriate cleaning extent for antiques requires understanding intended use and value considerations. Display pieces may benefit from partial cleaning removing heavy tarnish while preserving subtle patina. Functional items intended for use often receive complete restoration.
Hallmark preservation matters for marked antique silver. Historical stamps and maker’s marks may show delicate details. Gentle ultrasonic cleaning preserves these marks while removing tarnish from surrounding surfaces. Aggressive mechanical polishing can obliterate fine hallmark details over repeated cleanings.
Construction methods in antique silver sometimes used low-temperature solders or adhesives vulnerable to modern ultrasonic cleaning. Victorian and earlier pieces may incorporate assembled components that weren’t designed to withstand ultrasonic vibration. Conservative parameters and professional consultation suit questionable antique items.
Museums and serious collectors often consult conservation professionals before cleaning valuable antique silver. The irreversible nature of aggressive restoration warrants careful consideration when dealing with historically significant pieces.
Frequency and Power Settings That Matter
Ultrasonic operating parameters influence cleaning characteristics and effectiveness on silver tarnish.
Standard 40 kHz frequency represents the most common choice for silver cleaning applications. This frequency produces cavitation bubbles of moderate size balancing cleaning intensity with surface compatibility. Most commercial ultrasonic cleaners operate at 35 to 45 kHz.
The moderate bubble size at 40 kHz provides aggressive cleaning action suitable for tarnish removal while remaining gentle enough for most silver items. Testing across thousands of silver cleaning applications has established this frequency as optimal for general use.
Lower frequencies around 25 to 30 kHz generate larger, more energetic cavitation bubbles. The increased mechanical intensity benefits heavily tarnished items with thick tarnish layers requiring additional physical disruption. However, the aggressive action increases risks to delicate silver items or thin plating.
Higher frequencies from 80 to 130 kHz create smaller, gentler bubbles appropriate for delicate antique silver, thin plate, or items with fragile components. The reduced mechanical intensity maintains chemical enhancement benefits while minimizing vibration stress.
Some advanced ultrasonic cleaners offer multi-frequency capability or frequency sweeping. These features allow operators to select appropriate intensity for specific items. Frequency sweeping ensures uniform cavitation distribution across the entire tank volume.
Power density measured in watts per liter indicates ultrasonic intensity independent of tank size. Silver cleaning typically requires 50 to 100 watts per liter for effective tarnish removal. Lower power density produces gentle cleaning suitable for delicate items. Higher power density accelerates heavily tarnished item restoration.
Tank design and transducer placement affect power distribution. Quality ultrasonic cleaners position multiple transducers to create uniform cavitation throughout the tank rather than concentrated areas with dead zones.

Common Mistakes That Reduce Effectiveness
Avoiding typical errors ensures optimal silver tarnish removal results.
Using plain water without proper cleaning solution represents the most common mistake. Many users assume ultrasonic energy alone removes tarnish. Testing quickly reveals this assumption fails. Appropriate chemical formulation is essential for tarnish removal.
Insufficient cleaning time produces incomplete results when operators stop treatment before tarnish fully dissolves. Patience allowing adequate exposure achieves complete restoration rather than partial improvement. Visual monitoring guides appropriate stopping points.
Overcrowding the tank reduces effectiveness by creating shielded areas where items contact each other or basket surfaces. Proper spacing allows cavitation to reach all surfaces uniformly. Processing smaller batches with adequate spacing outperforms large crowded loads.
Cold solution use without heating dramatically extends required cleaning time. Room temperature chemistry proceeds slowly compared to heated solutions. Utilizing built-in heaters or pre-warming solutions before cleaning accelerates results substantially.
Inadequate rinsing after cleaning leaves residues that create spots or haze as they dry. Thorough rinsing in multiple changes of clean water followed by distilled water final rinse ensures residue removal and prevents water spots.
Ignoring solution depletion when processing multiple items reduces effectiveness as cleaning chemistry exhausts itself. Monitoring solution condition and refreshing when degradation appears maintains consistent performance throughout batch processing.
Inappropriate item positioning such as placing silver directly on tank bottom reduces cleaning effectiveness in that high-pressure zone. Using baskets or racks suspends items in optimal cavitation zones for uniform treatment.
Comparing Results: Ultrasonic vs Traditional Methods
Understanding comparative performance guides method selection for different applications.
Manual polishing using silver polish and cloth requires substantial labor and skill. The abrasive compounds physically remove tarnish along with small amounts of silver. Complex shapes, detailed engraving, and assembled pieces resist manual polishing, often retaining tarnish in recesses.
Polishing gradually removes silver from high points, eventually degrading fine details and engraving. Repeated polishing over years can significantly alter antique silver appearance. Ultrasonic cleaning avoids this metal removal by dissolving tarnish chemically rather than abrading it away.
Chemical dip solutions provide rapid tarnish removal through immersion in highly reactive formulations. These products work in seconds to minutes but often produce flat, unrealistic appearance lacking subtle luster. The harsh chemistry can damage silver if exposure extends beyond specified seconds.
Dip solutions struggle with complex three-dimensional forms where solution access varies. Deep recesses may not receive adequate chemical contact while exposed areas experience excessive exposure.
Aluminum foil electrochemical method using baking soda and aluminum foil relies on galvanic reduction. This popular home remedy works through electron transfer as aluminum oxidizes and reduces silver sulfide. While functional for simple items, results lack consistency and appearance may seem dull compared to optimized ultrasonic cleaning.
The foil method requires specific aluminum-to-silver positioning for good contact. Items with complex geometries show uneven results. Temperature control and timing remain imprecise compared to controlled ultrasonic processes.
Ultrasonic cleaning advantages include:
- Complete access to complex geometries including chains, filigree, and assembled pieces
- Uniform treatment across entire submerged surfaces
- No silver removal, preserving details and engraving
- Bright, natural luster rather than flat appearance
- Rapid treatment reducing labor requirements
- Consistent, repeatable results
The combination of chemical efficiency and mechanical enhancement positions ultrasonic cleaning as superior for most silver tarnish removal applications, particularly for valuable or complex items.
Protecting Silver After Ultrasonic Cleaning
Maintenance and protective measures extend the interval between cleaning sessions.
Immediate complete drying after cleaning prevents water spot formation and early tarnish initiation. Moisture remaining on cleaned silver accelerates tarnishing through electrochemical processes. Thorough drying using compressed air, soft cloths, or warm air eliminates this moisture.
Anti-tarnish product application creates protective barriers slowing atmospheric sulfur contact with silver surfaces. Commercial anti-tarnish solutions leave molecular films that remain invisible but reduce tarnishing rates substantially. Treated silver maintains brightness for months rather than weeks.
Application involves brief immersion or wiping treated solution onto cleaned, dried silver. The protective film forms as the carrier evaporates, requiring no wiping or buffing. Subsequent storage or use benefits from this protection.
Proper storage conditions dramatically affect re-tarnishing rates. Low humidity environments with minimal air circulation reduce tarnish formation. Sealed containers with anti-tarnish strips or silica gel desiccants provide excellent protection for stored silver.
Anti-tarnish cloth bags and storage rolls incorporate sulfur-absorbing materials into fabric. Silver stored in these specialized bags remains bright significantly longer than items stored openly.
Avoiding tarnish-promoting materials during storage preserves cleaned silver. Rubber, latex, wool, paper, and certain woods off-gas sulfur compounds accelerating tarnishing. Storing silver away from these materials or using barrier layers prevents chemical exposure.
Display considerations for silver items include climate control and air quality. Museums controlling temperature, humidity, and air filtration maintain exhibited silver with minimal tarnishing. Home display situations benefit from similar considerations to extent practical.
Regular maintenance cleaning before heavy tarnish accumulates requires less aggressive treatment than restoration of severely tarnished pieces. Brief ultrasonic cleaning every few months maintains excellent condition with minimal effort and chemical exposure.
Limitations and When to Avoid Ultrasonic Cleaning
Understanding restrictions prevents damage and guides alternative approaches when necessary.
Gemstone incompatibility represents the primary limitation for silver jewelry. While diamonds, rubies, and sapphires tolerate ultrasonic cleaning excellently, emeralds, opals, pearls, coral, amber, tanzanite, and many treated stones risk damage from cavitation or chemical exposure.
Items containing incompatible stones require alternative cleaning methods. Professional jewelers can sometimes remove stones for separate silver ultrasonic cleaning, then reset stones afterward, though this adds cost and complexity.
Adhesive-set components may fail under ultrasonic vibration or chemical exposure. Many costume jewelry pieces and some fine jewelry use adhesives rather than mechanical settings. The vibration can loosen adhesive bonds while heat from warm solutions may soften adhesives, causing component loss.
Enamel and decorative finishes may be damaged by either cavitation or tarnish removal chemistry. Silver items with painted details, enamel work, or applied decorative elements require evaluation. Some decorated pieces cannot be ultrasonically cleaned without finish damage.
Extremely thin or damaged silver plate showing extensive wear or base metal exposure cannot be safely restored through ultrasonic cleaning. The remaining silver layer may be too thin to withstand even gentle chemical exposure. These items require professional re-plating rather than cleaning.
Hollow items with sealed interiors may trap cleaning solution inside if small openings exist. The trapped solution continues chemical action after rinsing and may cause internal corrosion or leak out over time. Identifying hollow sealed items and ensuring complete solution evacuation prevents this problem.
Historical artifacts requiring conservation rather than restoration should not undergo ultrasonic cleaning without professional consultation. Museums and serious collectors employ conservators who assess appropriate treatment for valuable historical silver pieces.
When ultrasonic cleaning proves inappropriate, alternative gentle hand cleaning methods using appropriate chemistry without mechanical assistance provide safer options, though requiring more time and labor.
Previous: Do Ultrasonic Cleaners Remove Rust?