


Ultrasonic Cleaning for Fuel Injectors: What Works and What Doesn’t
Browse Volume:100 Classify:Support
Fuel injectors are precision-engineered components that deliver atomized fuel into an engine’s combustion chamber. Their ability to spray fuel in a fine, controlled mist directly impacts engine performance, fuel economy, and emissions. However, even with high-quality fuel, injectors are prone to clogging over time due to carbon buildup, varnish, and microscopic particulates.
These deposits form primarily at the nozzle tips, but can also build up internally—especially if the engine sits unused for long periods or if low-grade fuel is used. Poor fuel atomization leads to misfires, rough idling, poor throttle response, and increased exhaust emissions. In high-performance or turbocharged engines, even minor injector fouling can have outsized effects on power delivery and engine longevity.
Many drivers notice symptoms such as a drop in fuel efficiency or a slight hesitation under acceleration, and often assume it’s due to spark plugs or filters. Yet fuel injectors are a frequent and overlooked culprit.
Traditional Methods of Cleaning Fuel Injectors
Before ultrasonic cleaning became accessible to smaller workshops and enthusiasts, several standard methods were used to clean injectors:
On-Car Chemical Cleaning
One common technique involves running a concentrated detergent through the fuel rail with the engine running. While convenient, this method only treats surface deposits and cannot penetrate deeper blockages or varnish inside the injector body.
Manual Disassembly and Solvent Soaking
Technicians often remove injectors and soak them in specialized solvent baths. This can help loosen hardened deposits but lacks the mechanical agitation needed to thoroughly dislodge material inside fine internal channels.
Fuel Rail Flushing and Backflushing
Some shops use pressurized cleaning equipment to force cleaning agents backward through the injector. While more effective than soaking, it still may not remove all residue and requires special couplings and adapters for various injector types.
Despite their usefulness, all these methods rely heavily on chemical power and pressure. None offer the microscopic reach that ultrasonic cavitation delivers.
What Is Ultrasonic Cleaning and How Does It Work?
Ultrasonic cleaning is a process that uses high-frequency sound waves—typically ranging from 20 to 200 kHz—to generate microscopic cavitation bubbles in a liquid bath. These bubbles rapidly form and collapse, creating micro-jet impacts that scrub even the tiniest crevices of submerged items.
Unlike traditional cleaning methods that rely on brushing, soaking, or spraying, ultrasonic energy reaches every surface, crack, and channel. It doesn’t rely on line-of-sight and doesn’t cause mechanical wear.
In the context of automotive components, this is revolutionary. Fuel injectors have narrow internal passages, tiny orifices, and complex valve mechanisms. Cavitation bubbles penetrate these areas without disassembly beyond removing O-rings and filters, which are typically separated before cleaning anyway.
Key advantages:
- Reaches inaccessible internal channels
- Removes carbon, varnish, and fine particulates
- Compatible with a wide range of cleaning solutions
- Fast and non-abrasive
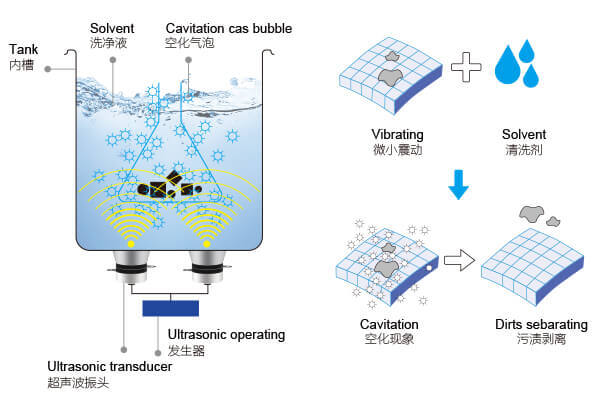
The Principle Behind Ultrasonic Cleaning
Can You Clean Fuel Injectors in an Ultrasonic Cleaner?
Absolutely—but with qualifications. Not all fuel injectors are created equal, and not all ultrasonic cleaners are suitable for injector cleaning.
What Makes Injectors Ultrasonic-Cleaner Friendly?
- Material Construction: Most fuel injectors are made from metals like stainless steel or aluminum, which handle ultrasonic cleaning well. However, plastic casings or electronic connectors should never be submerged unless they are removed or properly sealed.
- Size and Shape: Injectors are usually small enough to fit into a 2–6L ultrasonic bath, and their cylindrical design makes them ideal for even cavitation distribution.
- Disassemblability: While not all injectors can be fully disassembled, removing filters, O-rings, and electrical plugs is recommended. Direct exposure of delicate seals or sensors to ultrasonic cavitation should be avoided.
Types of Injectors Suitable for Ultrasonic Cleaning
- Port Fuel Injectors (PFI): Most common and easily cleaned in ultrasonic baths.
- Gasoline Direct Injection (GDI): Also cleanable, though care must be taken due to high-pressure internal parts and finer tolerances.
- Diesel Injectors: Can also be cleaned, especially if they are mechanical. However, solenoid- or piezo-controlled injectors require cautious handling.
Critically, ultrasonic cleaning only works if injectors are removed from the engine. Attempting to clean them on-car using ultrasonic methods is both impractical and ineffective.
Best Practices for Ultrasonic Cleaning of Fuel Injectors
To ensure effectiveness and safety when cleaning fuel injectors ultrasonically, proper setup and operation are essential. Here’s what professionals recommend:
Pre-Cleaning Preparation
- Remove Filters and O-Rings: These parts can degrade in ultrasonic baths and block cavitation.
- Use an Injector Pulse Driver: To simulate on/off spraying during the cleaning cycle, which helps dislodge internal debris. Several manufacturers offer dedicated injector pulsing tools that can be run simultaneously during ultrasonic cleaning.
Selecting the Right Ultrasonic Frequency
- 25–40 kHz: Suitable for heavy-duty cleaning where carbon deposits are significant.
- 60–80 kHz: Ideal for more delicate or precise injectors, offering finer cavitation with less pitting risk.
- 120+ kHz: Best reserved for very fine structures or microfluidic components—not typically needed for injectors.
For most automotive workshops, 40 kHz strikes the right balance between power and finesse.

Cleaning Solution and Temperature
- Use a non-flammable, water-based degreaser formulated for carbon and fuel residue. Alkaline cleaners between pH 9–11 are common.
- Add surfactants to improve cavitation and reduce surface tension.
- Recommended temperature: 50–60°C (122–140°F). Too hot, and cavitation becomes less effective; too cold, and cleaning slows down.
Cleaning Duration
- 10–20 minutes of ultrasonic exposure is typically sufficient.
- If using a pulse driver, synchronize it with the ultrasonic cycle.
Comparing Frequency Ranges: Why 40 kHz Isn’t Always Best
Ultrasonic cleaners come in a variety of frequency options. The standard for general-purpose cleaning—especially in automotive and industrial settings—is 40 kHz. However, not every injector or cleaning task benefits equally from this frequency.
Low Frequencies (25–40 kHz)
Lower frequencies create larger cavitation bubbles. When these bubbles collapse, they generate more forceful impacts. This makes 25–40 kHz excellent for removing stubborn carbon deposits, varnish, and gunk, especially on the outer surfaces of fuel injectors and internal channels clogged with visible grime.
But this force can also be a double-edged sword. If the injector has delicate components or precision-machined parts—especially in the case of GDI (Gasoline Direct Injection) injectors—this level of aggression might lead to micro-pitting or accelerated wear if used excessively.
High Frequencies (60–130 kHz)
Higher frequencies produce smaller, gentler cavitation bubbles. These are less destructive but reach into tighter crevices and deliver more uniform cleaning over intricate surfaces. They’re often preferred in the cleaning of microfluidic devices, lab instruments, and electronics.
In fuel injector cleaning, high-frequency ultrasonic cleaning is useful when:
- The injector has thin-wall geometries
- There are delicate seals or valve seats involved
- You’re cleaning multi-hole injector nozzles that require less brute force and more precision
Advanced Features: Sweep, Degas, and Pulse
- Sweep Mode shifts the frequency slightly during operation, improving uniformity and reducing standing waves (which can cause damage or leave untreated spots).
- Degas Function is useful when preparing the cleaning solution, as it removes dissolved air that can dampen cavitation.
- Pulse Mode temporarily increases ultrasonic intensity to help dislodge stuck-on contaminants in bursts.
When available, these features significantly enhance performance and are worth considering in your ultrasonic cleaner purchase—especially for professional injector service applications.
Laboratory & Shop-Grade Ultrasonic Equipment for Injectors
The effectiveness of ultrasonic cleaning for fuel injectors is not just about the theory—it also comes down to having the right equipment.
Choosing the Right Ultrasonic Cleaner
For automotive injector cleaning, you don’t need a massive industrial cleaner. Even a 3L–6L benchtop unit is enough to clean 4 to 8 injectors at once, depending on the basket size and layout.
Key features to look for:
- Adjustable frequency (or at least a standard 40 kHz)
- Timer with auto shutoff (10–30 minutes)
- Heater with adjustable temperature (ideally up to 80°C)
- Stainless steel tank (industrial-grade SUS304 or SUS316)
- Degas, sweep, or pulse functions (if available)
- Digital control panel for precision
Some models specifically designed for injector cleaning include specialized holders or racks that keep the injectors upright while exposing the nozzle tips to cavitation, which is often the dirtiest area.

Risks and Limitations of Using Ultrasonic Cleaning
Despite all the advantages, ultrasonic cleaning isn’t a silver bullet for every fuel injector, nor is it risk-free.
Situations Where Ultrasonic Cleaning Might Not Be Suitable
- Electronic Injectors with sensors or integral electronics should never be submerged unless the electronics are fully isolated or disassembled.
- Plastic-bodied Injectors may suffer from softening, deformation, or discoloration under high temperatures or aggressive solutions.
- Non-removable Seals or Filters may trap debris released during cleaning, worsening performance if not properly flushed afterward.
- Poor Drying and Residue left behind in micro-channels may lead to misfires or injector failure post-cleaning.
Preventing Damage
- Always test ultrasonic settings with a sacrificial part if you’re unsure of material tolerance.
- Avoid flammable or highly acidic solutions that may damage injector surfaces or the cleaner’s tank.
- Don’t exceed the manufacturer’s recommended run time, especially for delicate injectors.
- Dry injectors thoroughly post-cleaning with compressed air or a drying oven.
By understanding and respecting these limitations, ultrasonic cleaning becomes an extremely powerful tool rather than a liability.
Real-World Performance Gains After Ultrasonic Cleaning
Many automotive technicians and performance tuners swear by ultrasonic cleaning for restoring fuel injectors to like-new performance.
Common Observed Benefits:
- Restored spray pattern uniformity
- Improved fuel atomization
- Corrected flow rate across all cylinders
- Reduced misfires and hesitation
- Better cold starts and smoother idling
Professional Bench Testing Post-Cleaning
It’s standard practice in injector service labs to perform:
- Flow rate testing (before and after cleaning)
- Leak-down tests for seal integrity
- Spray pattern visualization to check mist formation
Case studies from performance tuning shops have shown that injectors clogged by as little as 5–10% can cause uneven cylinder performance, leading to reduced engine efficiency. After ultrasonic cleaning and flow matching, many engines regain factory-spec performance without any hardware replacements.
Some references on ultrasonic fuel injector cleaning performance:
- Society of Automotive Engineers (SAE) Paper 2001-01-2002: Demonstrates restoration of spray patterns in used injectors after ultrasonic treatment.
- Bosch Technical Bulletin on fuel system maintenance: Recommends ultrasonic cleaning as part of full-service injector refurbishment.
Professional vs DIY: When to Do It Yourself and When to Outsource
Ultrasonic cleaning has become increasingly accessible to DIYers and small garages. But is it always practical—or safe—to do it yourself?
When DIY Makes Sense
If you’re an automotive hobbyist or run a small workshop, investing in a compact ultrasonic cleaner can pay for itself quickly. Especially for owners of performance cars or older vehicles, regular injector cleaning can improve drivability without relying on fuel system additives.
- You have compatible injectors: Like PFI or mechanical diesel injectors that can be disassembled easily.
- You understand safe disassembly and reassembly: Mistakes here can cause leaks or flow issues.
- You have access to basic testing tools: Flow test benches or at least resistance meters and air pressure testers.
- You’re willing to buy a pulse driver: To stimulate internal movement while cleaning.
When to Leave It to the Pros
Professional injector cleaning services offer more than just ultrasonic baths. Their workflow typically includes:
- Multi-stage ultrasonic cleaning with detergents and degreasers
- Use of calibrated injector test benches
- Flow balancing to ensure uniform fuel delivery across all cylinders
- Detailed reports on each injector’s performance before and after service
Shops also offer warranties on their work and can spot early signs of injector failure. For modern vehicles, especially those with GDI or advanced diesel injection systems, professional services are often safer and more effective.
Tip: Many mail-in injector cleaning services operate online. You simply send in your injectors and get them returned fully cleaned, flow-tested, and ready for reinstallation—complete with performance charts.
Post-Cleaning: Testing and Reinstalling Injectors
Cleaning is only half the process. Once the injectors are cleaned ultrasonically, testing and correct reinstallation are critical.
Key Testing Steps
- Leak Test: Ensure no drips when injectors are closed under pressure.
- Flow Rate Matching: All injectors should spray within 2–3% of each other’s flow rate.
- Spray Pattern Analysis: Look for consistent mist and cone shape.
- Resistance Check: Measure injector coil resistance (usually 12–16 ohms for standard injectors) to ensure they haven’t been damaged during cleaning.
These tests can be done using a basic bench setup or outsourced to a service provider. If skipped, you run the risk of reinstalling a faulty or still-partially-blocked injector, defeating the purpose of cleaning.
Reinstallation Checklist
- Replace O-rings and seals with new parts
- Lubricate with clean engine oil before seating
- Torque fuel rail bolts to manufacturer specs
- Prime the fuel system before startup to prevent dry cranking
Neglecting these steps can result in fuel leaks, misfires, or even engine damage.
Academic and Industry References on Ultrasonic Fuel Injector Cleaning
Several scientific studies and white papers confirm the efficacy of ultrasonic cleaning for automotive fuel injectors:
- SAE Technical Paper 2001-01-2002
“Evaluation of Deposit Formation in Gasoline Direct Injection (GDI) Fuel Injectors”
https://doi.org/10.4271/2001-01-2002
Confirms that ultrasonic cleaning can restore spray patterns and flow rates in clogged GDI injectors. - Delphi Automotive Whitepaper on Injector Servicing
Explains the benefits of ultrasonic cleaning as part of reconditioning processes.
https://www.delphiautoparts.com/usa/en/resource-center - Branson Ultrasonics Application Guide
Details industry-recommended ultrasonic settings for cleaning fuel components.
https://www.bransonultrasonics.com/Applications/Automotive - “Ultrasonic Cleaning Technology” by John Durkee, Elsevier (2006)
Provides the physics and engineering background on cavitation-based cleaning, including examples from the automotive sector.
ISBN: 978-0-8080-8562-5
These sources confirm that ultrasonic cleaning is not a fringe or anecdotal method—it’s a validated technology used across industries, including aviation, medical, and high-performance automotive sectors.
Final Thoughts: Does Ultrasonic Cleaning Justify the Investment?
Ultrasonic cleaning offers a rare combination of precision, safety, and effectiveness when it comes to maintaining fuel injectors. Whether you’re a mechanic, a tuner, or just a car enthusiast who wants to keep their engine running smoothly, this technique bridges the gap between deep cleaning and component safety.
It’s not always necessary, nor is it foolproof. But when applied correctly, ultrasonic cleaning can:
- Restore engine performance
- Reduce emissions
- Extend injector lifespan
- Save money on replacements
Combined with post-cleaning testing and good reinstallation practices, ultrasonic cleaning becomes more than just a maintenance step—it becomes a performance restoration strategy backed by physics and proven in labs.