


Is It Safe to Clean Silver with an Ultrasonic Cleaner?
Browse Volume:163 Classify:Support
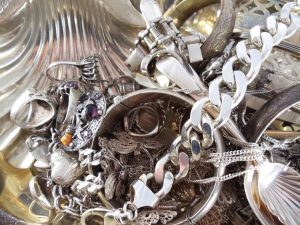
Silver, with its unmistakable luster and timeless elegance, occupies a cherished place in many of our lives—whether in heirloom jewelry, dining sets passed through generations, or finely crafted decorative pieces. But as anyone who owns silver knows, it doesn’t take long before that gleam begins to dull. Tarnish creeps in, fingerprints linger, and the once-vibrant shine becomes muted. Cleaning silver isn’t just about aesthetics—it’s about preservation. And in that search for the perfect cleaning method, ultrasonic cleaners often catch the eye.
Yet here’s the rub: silver is soft. Ultrasonic cleaning is powerful. So naturally, a question arises—can you use an ultrasonic cleaner on silver without damaging it?
Let’s unpack this in depth. Because while the answer is yes, it’s a nuanced yes—one that depends on understanding how ultrasonic cleaning works, the type of silver you’re dealing with, and how to strike the right balance between effectiveness and caution.
The Silver Dilemma: Beauty, Tarnish, and Care
Silver’s appeal goes far beyond its radiant finish. It has antimicrobial properties, unmatched workability, and a rich cultural history. But it also has a tendency to tarnish—especially when exposed to sulfur in the air, skin oils, or rubber-based materials. That distinctive yellow-gray film that creeps over silver isn’t just dust; it’s a chemical transformation: silver sulfide.
Now, some people take a soft cloth to their silverware after every use. Others let it accumulate layers of patina, believing it adds character. For most of us, though, cleaning becomes a periodic task—either when the tarnish becomes too obvious, or when we need to prepare silver for display, wear, or sale.
Traditional cleaning methods range from commercial dips to baking soda pastes to hours of rubbing with microfiber cloths. They work—but they also take time, elbow grease, and often, risk micro-scratching the surface.
That’s where ultrasonic cleaning comes in. It promises a gentler, more thorough clean, especially for intricate or hard-to-reach areas. But can this technology live up to its potential without harming your precious silver?
How Ultrasonic Cleaning Works
To understand whether ultrasonic cleaners are safe for silver, we first need to understand what these machines actually do. Picture a tank of water infused with a cleaning solution. Inside, high-frequency sound waves (usually in the 20–200 kHz range) generate millions of microscopic bubbles—a process known as cavitation. These bubbles collapse violently and rapidly, creating mini shockwaves that gently dislodge dirt, oil, and particles from the surface of whatever is submerged.
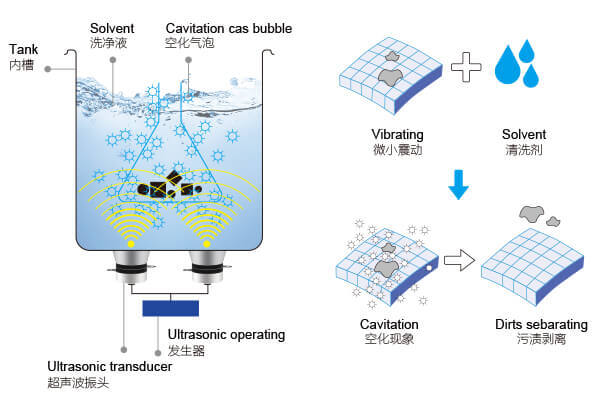
The Principle Behind Ultrasonic Cleaning
It sounds aggressive, and in a way, it is—but on a microscopic level. That’s why ultrasonic cleaners are revered for their ability to clean without abrasion, making them ideal for things like dental tools, circuit boards, watch gears—and yes, jewelry.
But silver presents a particular challenge. It’s soft, highly reactive, and often combined with other materials (like gems or adhesives) that may not tolerate ultrasonic waves as well.
So let’s get into the core of the matter.
Can Ultrasonic Cleaners Be Used on Silver?
Yes, they can—but this is where the conversation really begins, not ends.
Cleaning silver in an ultrasonic cleaner isn’t a question of can, but how—and what kind of silver we’re talking about. For example:
- Sterling silver (92.5% silver) is commonly used in jewelry and flatware. It can be safely cleaned in an ultrasonic cleaner, assuming it doesn’t have soft or porous stones attached.
- Silver-plated items may have a thin coating of silver over a base metal. If the plating is old, worn, or damaged, ultrasonic waves can lift or crack it further.
- Antique silver often includes soldered parts, patinas, or decorative inlays that may not survive a harsh ultrasonic cycle.
And even among sterling silver, not all items are equal. A plain silver bracelet? Usually safe. A silver pendant holding an opal or glued gemstone? Proceed with caution—or don’t proceed at all.
This variability is why ultrasonic cleaning silver has sparked both praise and fear in equal measure across forums, jewelry stores, and cleaning guides. The key is understanding your specific piece—and the chemistry of the cleaning process.
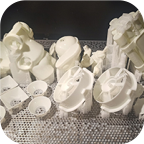
Jewelry cleaning
What Happens When You Clean Silver Ultrasonically?
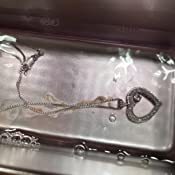
Once your silver item is immersed in the ultrasonic bath and the machine is turned on, cavitation begins almost instantly. Millions of microbubbles form and collapse, producing tiny, high-energy shockwaves that penetrate even the most delicate engravings and nooks. Dirt, grime, body oils, and even tarnish particles are lifted and carried away into the solution.
On the surface, it’s magic. A delicate silver chain tangled with years of oxidation and sweat residue can emerge with a brilliance you haven’t seen in years—all within just 3–10 minutes. But beneath the surface, there’s a lot happening, and not all of it is benign.
Silver’s softness makes it vulnerable to scratching and warping under mechanical stress. While ultrasonic cleaners don’t scrape, the constant barrage of micro-shockwaves can accelerate wear if the piece is already compromised—especially around soldered joints or thin decorative elements. Moreover, cavitation can interact with oxidized or plated surfaces in unexpected ways, occasionally leading to discoloration or patchy finishes if the solution isn’t properly balanced.
The chemistry of the solution matters, too. Certain cleaning agents, especially those with ammonia, strong acids, or peroxides, can react negatively with silver. These reactions don’t always result in visible damage right away—but over time, they can dull the finish, pit the surface, or cause irreversible chemical etching.
This is why using the right cleaning fluid is just as important as using the right machine settings.
What You Should Never Do
There are some universal “don’ts” when it comes to ultrasonic silver cleaning—and breaking these rules can mean the difference between restoring a masterpiece and ruining it.
First and foremost: never clean silver items that include porous or heat-sensitive gemstones. Opals, pearls, turquoise, amber, and some treated or dyed stones can crack, discolor, or completely detach in an ultrasonic cleaner. Even diamonds, while extremely hard, may loosen from their mountings if the prongs are weakened.
Also avoid:
- Items with glue or epoxy, like costume jewelry or handcrafted silver decorations.
- Engraved antiques or hollow silver objects, where trapped air or hidden cracks may expand under vibration and cause structural failure.
- Ammonia-based or highly alkaline solutions, unless you’re absolutely sure the concentration and exposure time are safe. Many off-the-shelf jewelry cleaners contain ingredients that degrade silver over time if used improperly.
And perhaps most importantly, don’t run the ultrasonic cleaner without testing a less valuable or less sentimental piece first. No matter how gentle the settings, it’s always best to err on the side of caution.
The Right Way to Clean Silver in Ultrasonic Cleaners
If you’re going to clean silver ultrasonically, it’s worth doing it right—and that means controlling every element of the process.
Start with the cleaning solution. Look for a neutral-pH, ammonia-free, silver-safe ultrasonic detergent, preferably one formulated specifically for precious metals. These solutions contain mild surfactants that dissolve oils and tarnish without harming the metal’s surface.
Next, temperature plays a subtle but crucial role. Most ultrasonic cleaning works best between 40°C and 60°C (104–140°F). Silver doesn’t need excessive heat—too much warmth can accelerate chemical reactions and damage fragile components. Stay at the lower end of the spectrum for delicate items.
Timing matters, too. A common mistake is to run the machine longer, thinking “more time equals cleaner results.” But in reality, 3–5 minutes is usually sufficient for lightly tarnished silver, while heavier buildup might require 7–10 minutes max. Anything longer, and you risk overexposing the surface.
Where possible, suspend silver items in a beaker or mesh basket inside the tank. This avoids direct contact with the metal tank base, which could cause micro-abrasions during intense cavitation. Some professionals even place their silver inside a smaller beaker filled with cleaning solution, then immerse the beaker itself in the ultrasonic bath. This “beaker-in-tank” method isolates the piece while still allowing ultrasonic energy to do its job—safely and efficiently.
And finally, always rinse the silver thoroughly with distilled water after cleaning. This removes any lingering chemical residues that might accelerate tarnishing. Dry with a soft, lint-free cloth and store in anti-tarnish pouches if available.
Real-World Examples: Jewelers, Watchmakers, and Collectors
If you want to understand the full potential—and limitations—of ultrasonic cleaning for silver, look no further than the professionals who work with it daily. Jewelers, in particular, have embraced ultrasonic cleaning as an essential part of their workflow. When a customer brings in a tarnished silver necklace or a set of heavily used rings, ultrasonic cleaning offers a fast, consistent way to restore shine, especially for intricate designs that would take hours to clean manually.
Take fine jewelry workshops, for instance. They often use ultrasonic cleaners as the first step in a multi-phase restoration process. After an ultrasonic cycle removes surface grime, jewelers can more easily inspect for loose prongs, cracks, or flaws before polishing or resetting stones. Some even clean silver twice—once before repairs and again after polishing—demonstrating just how central ultrasonic technology is to professional jewelry care.
Watchmakers are another group that relies on ultrasonic cleaning, particularly when dealing with vintage silver pocket watches or silver-link bracelets. With so many micro-parts, crevices, and delicate gear mechanisms, ultrasonic cleaners help ensure a level of cleanliness that manual tools simply can’t achieve. That said, watchmakers are also known for being cautious—they often disassemble components and clean them individually, minimizing exposure of vulnerable materials to the ultrasonic bath.
Even antique collectors and conservators use ultrasonic cleaners—but selectively. For newer sterling silver pieces, especially those used regularly (like flatware or serving sets), an ultrasonic cleaner can be a time-saving marvel. However, with museum-grade or 19th-century pieces that include enamel, rivets, or soldered components, many conservators opt for manual methods or localized ultrasonic cleaning with custom probes and microtanks.
In all these professional scenarios, a common thread emerges: ultrasonic cleaners are embraced as powerful tools—but never used blindly. Settings are adjusted. Solutions are selected carefully. Items are inspected before and after. In other words, technology is paired with expertise—and that’s a model worth emulating for home users.
Risks and Misunderstandings
Despite its widespread use, ultrasonic cleaning is often misunderstood—especially on forums and DIY websites. You might come across claims like “ultrasonic cleaners destroy silver” or “they strip away plating.” And while there’s usually a sliver of truth in these warnings, the reality is far more nuanced.
For example, ultrasonic cleaners do not inherently remove silver plating. What they can do, however, is accelerate pre-existing damage. If your silver-plated item already has micro-cracks, worn areas, or inconsistent thickness, the cavitation energy may lift or flake the compromised sections. But that’s not the ultrasonic cleaner’s fault—it’s revealing flaws that are already present.
Similarly, the notion that ultrasonic cleaning always causes pitting or scratching is largely exaggerated. Pitting is typically a chemical issue, not a mechanical one. It happens when the solution used is too alkaline or acidic, or when contaminants (like chlorine) react with the silver’s surface. If you’re using a silver-safe solution, keeping the bath clean, and not running cycles for excessive durations, the chances of pitting are minimal.
Another common misunderstanding? That ultrasonic cleaning replaces polishing. It doesn’t. Ultrasonic cleaning is about removing contaminants, not repairing surface damage. If your silver is scratched, dulled, or uneven in shine, you’ll still need to polish it manually or with a professional-grade buffer afterward.
Understanding these nuances helps you avoid both unnecessary fear and careless mistakes. It’s not about blindly trusting or rejecting the technology—it’s about knowing when and how to use it properly.
How to Spot Trouble Early
Even when used with the utmost care, ultrasonic cleaning isn’t 100% risk-free—especially with silver. Recognizing early signs of trouble can help you catch and correct issues before they become serious.
The first thing to watch for is unexpected discoloration. If your silver develops yellowish or bluish hues after cleaning, it’s often a chemical reaction, not a physical one. This could be due to an unsuitable cleaning solution or impurities in the water, especially if you’re using tap water with high mineral content. Switching to distilled water and a silver-safe detergent can help prevent this in future cycles.
Another red flag is surface pitting or mottling, which may look like tiny holes or a matte, uneven texture where the silver used to be smooth. This is usually the result of leaving the item in too long, using a harsh solution, or cleaning already-damaged surfaces. Unfortunately, pitting is irreversible—but early-stage damage might be polished out if caught in time.
Next, loose stones or broken solder joints can be a problem, especially if your silver item includes mounted elements. After ultrasonic cleaning, always inspect jewelry carefully. Wiggle each stone gently with a toothpick or your fingertip. If anything feels loose, stop wearing it and take it to a jeweler for professional repair.
And perhaps most frustratingly, tarnish returning faster than expected can signal chemical residue left behind. If not properly rinsed after cleaning, silver can tarnish even quicker than before. Always rinse thoroughly with distilled water and dry completely. Some users also finish with a silver polishing cloth to restore anti-tarnish coatings or add an extra layer of protection.
Ultimately, the goal isn’t to expect perfection—but to remain observant. With practice, most ultrasonic users develop an intuitive sense for how long to clean, which items are safe, and when it’s time to stop and reassess.
Alternatives: When NOT to Use Ultrasonic on Silver
As much as ultrasonic cleaners are a revelation for modern silver care, they’re not always the right choice. There are times when manual cleaning is not only safer but more respectful to the item’s age, craftsmanship, and fragility.
A classic example: antique silver with hand-soldered joints. Many older pieces—especially those from the Victorian era or earlier—were made using softer solders that may weaken or dissolve under ultrasonic conditions. The vibrations can stress these joints and lead to splits or separation. If the piece is irreplaceable or of high sentimental value, stick with a soft polishing cloth and a gentle paste instead.
Another category to avoid is silver items that include glued elements. Think of silver lockets with fabric inlays, or brooches with enamel work. The adhesive might not withstand even a short ultrasonic cycle. Similarly, silver with painted or oxidized accents can be permanently altered. Some blackened silver relies on surface treatments that are intentionally left intact. Ultrasonic cleaning can inadvertently strip these away.
And if your silver is paired with natural materials like wood, leather, or certain resins, you should be extra cautious. These materials often absorb moisture and may warp, crack, or degrade under ultrasonic exposure.
The good news is that ultrasonic cleaning doesn’t have to be all or nothing. You can always test a small, less valuable piece first. Or, in some cases, clean just the silver portion with a micro-brush or spot-cleaning method while avoiding the delicate components entirely.
Your cleaning method should match the item’s complexity. It’s not about being afraid of technology—it’s about being wise with what matters.
What Happens to the Cleaning Solution?
After multiple cleaning sessions, your once-clear ultrasonic cleaning solution will begin to look cloudy or dirty—sometimes even before it smells off or stops working effectively. But what’s actually happening inside that tank?
Each ultrasonic cycle dislodges tiny particles of dirt, body oils, tarnish, soap residue, and even microscopic metal fragments. These contaminants remain suspended or dissolved in the liquid, which reduces the effectiveness of future cleaning and, more importantly, may begin to chemically interact with your silver in undesirable ways.
Some contaminants, especially sulfur compounds or acidic residues, can actually accelerate tarnishing if left to linger in the bath. That’s why professionals recommend changing the solution regularly, particularly after cleaning heavily tarnished or particularly dirty items.
This is even more critical when working with silver. Residual sulfur from tarnish or organic debris can bond to the silver surface during subsequent cleaning cycles, causing spotting or even permanent dulling.
And if you’re using commercial ultrasonic solutions, be aware that many contain surfactants, emulsifiers, and mild acids. While these are safe in small quantities, they’re not meant to be flushed into household drains in large volumes—especially if they’re full of metal ions or other pollutants.
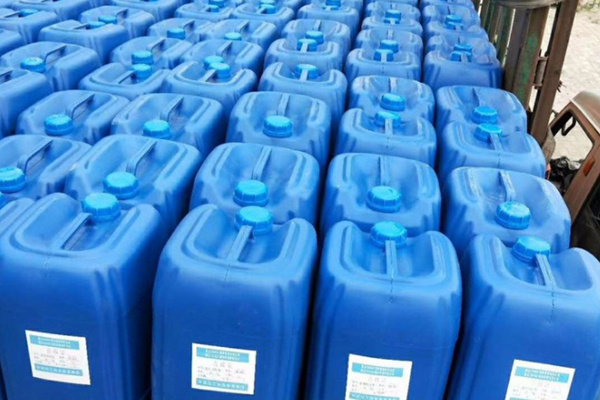
Cleaning Solution
Safe Disposal of Used Silver Cleaning Fluids
So how should you dispose of used ultrasonic cleaning solution after it has cleaned silver? The answer depends largely on the composition of the solution and your local regulations.
For basic homemade mixtures, like a few drops of dish soap in water, it’s generally safe to dispose of the used solution down the drain—assuming no hazardous contaminants are present. However, even here, a filter or mesh can be helpful to catch larger particles before rinsing.
For commercial ultrasonic cleaning solutions, especially those labeled as “industrial,” “acidic,” or “oxidizing,” you’ll need to be more cautious. Check the manufacturer’s SDS (Safety Data Sheet)—most reputable brands like Branson or Elma provide these online. The SDS will specify if the solution is biodegradable or if it requires special disposal as hazardous waste.
When in doubt:
- Let the solution cool and settle. Allow particles to fall to the bottom of the tank, then decant the clear liquid.
- Use absorbent pads or activated carbon filters to neutralize chemical residues.
- Contact your local hazardous waste facility if the solution contains silver ions, ammonia, or any compound classified as a pollutant.
Some regions also allow neutralization of acidic or basic solutions before disposal. For example, you might add baking soda to neutralize an acidic bath—but only if you know exactly what’s in it and have proper pH test strips on hand.
Eco-conscious users may opt for biodegradable, silver-safe detergents, many of which are enzyme-based and break down safely over time. These are not only better for the environment, but also gentler on your ultrasonic tank’s internal components.
Granbo ultrasonic Jewelry Cleaning
A Tool Worth Mastering
Ultrasonic cleaning is neither miracle nor menace—it’s a tool. And like any tool, it delivers its best results when used with skill, intention, and a little respect for the materials involved.
Silver, as a precious metal, has a unique blend of durability and delicacy. It can shine like no other, but it also tells the story of its age and usage with every tarnish spot and scratch. Ultrasonic cleaning offers a way to renew that shine without stripping the story—provided you know when to use it, and when to take a gentler path.
It’s not just about clean jewelry. It’s about honoring your belongings while keeping them beautiful, safe, and lasting. The hum of an ultrasonic machine isn’t just background noise—it’s the quiet sound of care, precision, and modern craftsmanship at work.