


Best Liquids for Cleaning Jewelry in an Ultrasonic Cleaner
Browse Volume:207 Classify:Support
There is something incredibly satisfying about seeing old jewelry gleam like new again. Whether it is a wedding ring dulled by lotion residue or a pair of earrings clouded by time, bringing back that sparkle feels like magic. But behind the magic is science—specifically, ultrasonic cleaning. And at the heart of this process lies an often-overlooked question: what liquid should you actually use in an ultrasonic cleaner to clean jewelry safely and effectively?
It might seem tempting to pour in just water and hit the power button. After all, ultrasonic cleaners are known for their efficiency. But the truth is, the cleaning liquid plays a crucial role in whether your cherished pieces come out spotless or stay grimy—or worse, damaged. Choosing the right solution involves understanding how ultrasonic cleaning works and how different types of liquids interact with precious metals and delicate gemstones.
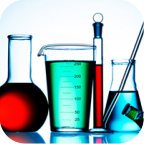
A close-up photo of an ultrasonic jewelry cleaner
Let’s start by peeling back the surface on what ultrasonic cleaning actually does to jewelry, and then examine which types of liquids are compatible—or problematic—for different materials. Whether you’re a first-time user or someone upgrading from manual brushing, knowing your liquid options could make all the difference.
Why Liquid Choice Matters in Ultrasonic Jewelry Cleaning
Ultrasonic cleaning relies on high-frequency sound waves—usually in the range of 20 to 200 kilohertz—transmitted through a liquid medium. These sound waves generate millions of microscopic bubbles that collapse rapidly in a process known as cavitation. When these bubbles burst, they release tiny shockwaves that dislodge dirt, oil, and oxidation from even the most intricate crevices of jewelry.
However, this cavitation effect cannot occur in a vacuum. The liquid inside the cleaner does more than just carry the waves—it determines how effectively those waves will form bubbles, how well those bubbles will penetrate grime, and how safely the jewelry surfaces are treated. The wrong liquid can dampen ultrasonic energy, fail to lift residues, or even damage sensitive components like pearls or porous stones.
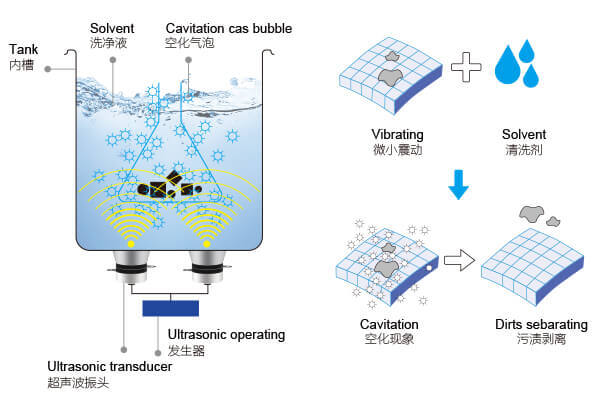
The Principle Behind Ultrasonic Cleaning
It’s a bit like washing a car with only water—sure, some dust will rinse off, but real cleaning demands more than just soaking. Likewise, simply dunking your jewelry in tap water may leave behind deposits or fail to fully break down oils. That’s why choosing an appropriate solution is not only about cleaning power—it’s also about compatibility, preservation, and safety.
For instance, distilled water ensures there are no added minerals that could cause spotting or react with metal surfaces. Mild detergents can reduce surface tension, helping bubbles form more efficiently. Specialized cleaning concentrates are often pH-balanced and formulated to break down organic residues without harming fragile surfaces.
So, should you always mix in a chemical agent? Or are there times when just distilled water is enough? The answer depends entirely on what you’re cleaning—and what you’re hoping to preserve.
Matching Liquids to Jewelry Types: A Delicate Balance
When selecting the right liquid for ultrasonic cleaning, one size does not fit all. The material and construction of your jewelry determine not only what will clean best but also what could potentially cause irreversible damage. It is in this delicate balance between cleaning power and preservation that the liquid choice becomes paramount.
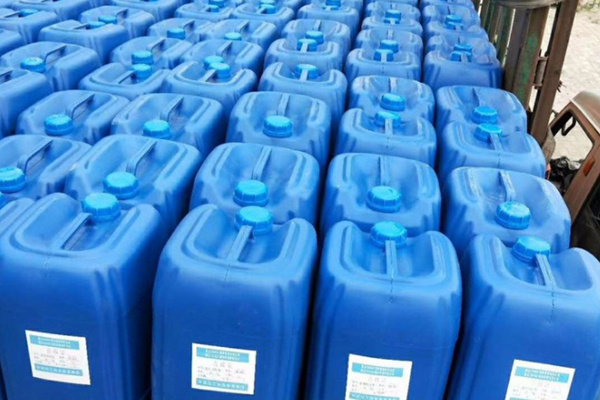
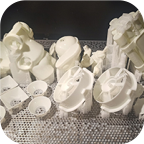
Ultrasonic cleaning solution
Let’s begin with the classics—solid gold and platinum. These noble metals are generally safe in ultrasonic cleaners, and a mix of distilled water and a mild, ammonia-free detergent is often ideal. This combination loosens oils and skin residue without affecting the metal’s surface or shine. For tougher grime, a cleaner with a slightly alkaline pH, around 9 to 10, can be more effective while still being safe.
Silver, though also a precious metal, poses a trickier challenge. While ultrasonic energy can help remove tarnish, the use of certain chemical agents—like those containing chlorine or phosphates—can accelerate corrosion. A safe choice here would be distilled water mixed with a silver-safe solution specifically designed to protect against chemical wear. Avoid anything too acidic or abrasive, as these can dull the metal or scratch its surface.
Then there are gemstones. Diamonds, rubies, and sapphires (those ranking high on the Mohs scale) can typically withstand ultrasonic waves, especially when set securely. For these, a simple mix of distilled water and mild detergent works well. However, care must be taken with the settings—vintage prongs or worn bezels could loosen under prolonged exposure. Always inspect the mounting beforehand.
Contrast that with porous or organic gemstones—pearls, opals, emeralds, turquoise, and coral. These are absolutely not candidates for ultrasonic cleaning, regardless of what liquid is used. Their surfaces are too soft, their internal structures too fragile, and their finishes too easily compromised. Even the gentlest cleaning liquid could cause microfractures or clouding.
In cases where multiple types of materials are present in one piece—say, a gold ring set with pearls—ultrasonic cleaning should be avoided altogether. No liquid can simultaneously protect and clean all materials in such mixed-condition jewelry.
This is why, even though ultrasonic cleaning seems universal, the smart choice of liquid can mean the difference between brilliance and regret. Matching liquid not only to the machine, but to the material, is key to cleaning effectively while safeguarding what matters.
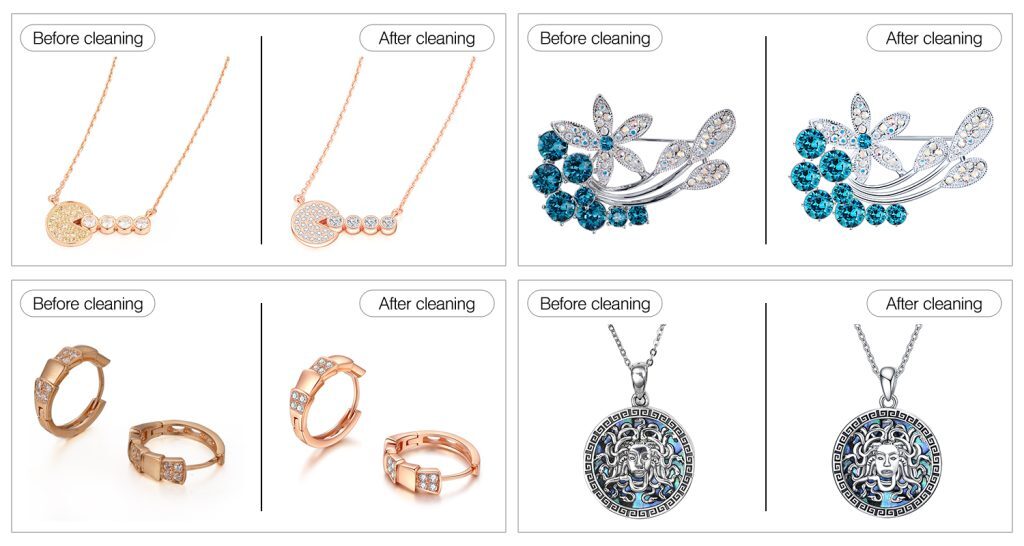
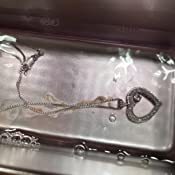
granbo ultrasonic Jewelry Cleaning effect
DIY Solutions vs Commercial Formulations: Which Is Better for Jewelry?
At first glance, creating your own ultrasonic cleaning solution at home can feel like a smart, cost-saving move. After all, what harm could a few drops of dish soap in warm water really do? The truth, however, lies in the complexity of the jewelry itself and the precision of ultrasonic technology. What works in a sink does not necessarily work inside a cavitation chamber.
Homemade solutions are often based on simple recipes—dishwashing liquid, baking soda, or vinegar diluted in water. These substances might be harmless for daily cleaning of glassware or steel cutlery, but jewelry requires a much gentler, material-aware approach. Dish soaps often contain surfactants, scents, and dyes that leave residues or react with delicate metals and stones. Baking soda is alkaline and mildly abrasive, which can cloud gemstones and scratch gold. Vinegar, though a popular cleaning agent, is acidic and can corrode alloys, especially when ultrasonic energy intensifies the reaction.
Distilled water alone, while safe, lacks the emulsifying power to lift oils, lotions, or accumulated grime embedded in jewelry. So while using just water will avoid harm, it will also underdeliver in terms of results. In contrast, professionally developed ultrasonic cleaning solutions are designed to balance pH, surfactant strength, and residue control. They are typically biodegradable, non-corrosive, and tested to avoid adverse chemical reactions with metals and stones.
Still, some users insist on experimenting at home—and if you do, it is essential to test your DIY formula on a less valuable item first. Avoid anything with ammonia or chlorine, and always keep the solution neutral or mildly alkaline. Maintain the temperature below 40 degrees Celsius and limit the cleaning cycle to under five minutes. Most importantly, ensure thorough rinsing afterward, as lingering homemade formulas may continue reacting with the jewelry surface long after the cleaning ends.
Professional ultrasonic cleaning fluids, on the other hand, often come with safety data sheets, exact dilution instructions, and compatibility charts. These make them not only more effective, but also more predictable and safer. For people cleaning multiple items, or expensive or heirloom-quality jewelry, the cost of using a quality liquid is easily offset by the protection it provides.
In short, DIY cleaning liquids may work in a pinch—but they come with more risks than rewards when it comes to valuable or delicate jewelry. Commercial formulations are more than just bottled water with fancy labels; they are engineered to do the job well and safely.
Understanding pH Levels and Why They Matter in Jewelry Cleaning
The concept of pH might bring back memories of chemistry class, but in ultrasonic cleaning, it plays a surprisingly important role. pH, which measures how acidic or alkaline a liquid is, can dramatically affect the performance and safety of an ultrasonic cleaning solution—especially when it comes to fine jewelry.
Jewelry comes in many forms, from pure gold rings and sterling silver pendants to platinum bands and gem-encrusted earrings. Each of these materials reacts differently to acidic or alkaline environments. For instance, sterling silver is known to tarnish more rapidly in the presence of acids. Pearls and opals, both of which are calcium-based, can be irreversibly damaged in acidic solutions. On the other hand, high alkalinity can dull the finish of gold and platinum or weaken the setting around delicate stones.
Most ultrasonic jewelry cleaning solutions fall within a safe pH range of 7 to 10. Neutral pH (around 7) is generally safest for a wide range of materials, particularly when cleaning mixed-metal or gem-studded pieces. Mildly alkaline solutions, with a pH between 8 and 10, are more effective at removing oils, skin residue, and cosmetic build-up. They offer greater emulsifying power without posing a high risk to most jewelry types.
The reason pH matters so much in ultrasonic cleaning is due to how cavitation amplifies the chemical activity of the cleaning liquid. When ultrasonic waves create microscopic bubbles that implode with force, they also agitate the solution at a molecular level. If the solution is even mildly corrosive or reactive, this agitation can accelerate wear or cause subtle etching on metal surfaces. That is why simply adding household cleaners—many of which have strong acidic or alkaline profiles—to an ultrasonic cleaner can do more harm than good.
Some jewelry cleaning fluids are specially formulated to maintain a stable pH throughout the cleaning process. These solutions also contain corrosion inhibitors, anti-foaming agents, and rinse aids to ensure the cleaning is not just effective, but also leaves the jewelry in a pristine, residue-free condition.
If you ever find yourself unsure about the pH of a cleaning solution, test strips are widely available and inexpensive. They can help verify the compatibility of a liquid with your ultrasonic cleaner and the specific type of jewelry you plan to clean. It’s a simple step, but one that could save your heirloom necklace or engagement ring from irreversible damage.
Temperature and Time: The Twin Pillars of Safe and Effective Jewelry Cleaning
While the cleaning solution and its pH level provide the foundation for ultrasonic jewelry care, temperature and cleaning time are what bring the process to life. Think of them as the thermostat and timer of a professional chef—too hot or too long, and the dish is ruined; just right, and you bring out the very best.
In ultrasonic cleaning, temperature is not simply about warmth. It actively enhances cavitation. As the water or cleaning solution is heated, the viscosity decreases and surface tension loosens, which allows ultrasonic waves to form cavitation bubbles more easily. These bubbles then collapse with greater intensity, dislodging contaminants more effectively from the surface and microscopic crevices of jewelry.
Most ultrasonic jewelry cleaners operate efficiently between 40 to 60 degrees Celsius. For general use, 50 degrees is often the sweet spot. It is warm enough to intensify the cleaning process but not so hot that it risks harming delicate components like adhesives or soft gemstones.
Time is the other half of the equation. Contrary to what one might assume, longer cleaning times do not always lead to better results. In fact, prolonged ultrasonic exposure can wear down soft metals, loosen gem settings, or even cause microfractures in vulnerable stones. For most jewelry, especially gold and platinum without gemstones, a cleaning cycle of 3 to 5 minutes is sufficient. For items with more buildup, or intricate parts like chain links or filigree work, up to 10 minutes may be acceptable—provided the materials are robust and the temperature is well-controlled.
On the flip side, delicate pieces, such as those with pearls, turquoise, opals, or glued components, may benefit from a cooler solution and a shorter cycle—perhaps as brief as 90 seconds. Many modern ultrasonic units come with pre-programmed cycles tailored to these needs, often labeled as “gentle,” “delicate,” or “low-heat.”
It is always a good idea to monitor your jewelry during the first few cleaning cycles. Take mental notes on how each type responds. If you observe any change in luster, color, or setting tightness, it might be wise to adjust your parameters or consult a professional.
Aftercare Matters: What to Do After Ultrasonic Cleaning
Cleaning jewelry with an ultrasonic cleaner is only part of the story. What happens afterward can significantly affect both the longevity and appearance of your cherished pieces. Just as a freshly washed car deserves a proper dry and polish, jewelry needs its own finishing touch after ultrasonic treatment.
As soon as the cleaning cycle finishes, avoid letting your jewelry sit in the warm solution for too long. Prolonged soaking—especially in heated detergent—may degrade certain materials or leave faint residues on the surface. Instead, use non-metallic tongs or gloves to carefully lift your jewelry out of the basket. This avoids skin contact with potentially irritating residues and protects the item from accidental drops.
Rinse each item under lukewarm distilled water. Why distilled? Because tap water can contain minerals or chlorine that leave deposits or cause chemical reactions, especially on high-karat gold or silver. A soft-bristled brush, like a baby toothbrush, can be used to gently dislodge any stubborn debris still clinging to crevices. Avoid applying too much pressure—remember, ultrasonic cleaning has already done the heavy lifting.
Drying is just as important. Letting your jewelry air dry might sound harmless, but it can lead to water spots or streaks, especially on highly polished surfaces. Instead, pat dry using a lint-free microfiber cloth. For pieces with intricate designs or narrow channels, you might use compressed air or a hair dryer set to cool mode to ensure no moisture is trapped inside.
Once dry, take a moment to inspect each piece. Ultrasonic vibrations, though subtle, can occasionally loosen prongs or settings—particularly in rings and earrings. Use a magnifying glass or loupe to check stone security. If you notice any movement, do not wear the item until a jeweler tightens the setting.
As a final touch, storing the jewelry properly ensures the cleaning was not in vain. Avoid tossing everything back into a shared box. Soft pouches or felt-lined trays help prevent scratches and slow down tarnish buildup. Pieces with high-sensitivity to moisture or light—such as pearls and opals—should be stored in breathable materials rather than airtight plastic, which can trap humidity.
When done correctly, post-cleaning care can significantly extend the time between each ultrasonic cycle. It is a simple practice that maximizes the brilliance, hygiene, and structural integrity of your collection.
Long-Term Maintenance and Practical Usage Tips
Even the most carefully selected ultrasonic cleaning liquid will not guarantee lasting results if the equipment and jewelry are not cared for consistently. One of the most overlooked factors in ultrasonic cleaning is maintenance—not just of the jewelry, but of the cleaner itself and the cleaning solution.
Let’s begin with the bath. Whether you’re using distilled water with a drop of mild detergent or a professional-grade concentrate, the solution should be changed regularly. Dirty solution doesn’t just stop cleaning efficiently—it can actually re-deposit grime back onto your jewelry. Think of it like washing dishes in muddy water: you’re going through the motions, but the result might be worse than where you started.
For home users, the sweet spot is to replace the cleaning solution every few uses, or sooner if you notice cloudiness, floating debris, or unpleasant odors. If you’re cleaning especially greasy items, such as rings worn during workouts or kitchen prep, you might need to change the solution after every session.
The ultrasonic cleaner itself also deserves care. Most models, especially tabletop units designed for jewelry, have stainless steel tanks. These should be rinsed and dried after each use. Residue from detergents or chemical concentrates can corrode the tank lining over time, particularly if left standing overnight.
Another tip: avoid overloading the tank. It can be tempting to drop in several items at once, but too many pieces can interfere with cavitation and lead to uneven cleaning. Jewelry should ideally be spaced apart in a basket or tray, fully immersed but not touching each other.
When in doubt about a specific jewelry piece—perhaps it is extremely valuable, antique, or constructed with mixed materials—consult a jeweler. They often have access to more advanced ultrasonic setups with temperature and frequency controls and may be able to recommend a suitable cleaning solution based on the item’s age, setting, and materials.
The temperature setting of your ultrasonic unit also plays a significant role. Most cleaning solutions become more effective at warm temperatures between 40 and 60 degrees Celsius, especially when oils and residues are involved. But be cautious—materials like pearls, adhesives, or lacquered finishes may degrade with heat. Always check both your jewelry’s specs and the cleaning solution’s recommended range.
Finally, do not underestimate the value of rinsing after ultrasonic cleaning. Once the cleaning cycle is done, rinse the jewelry in clean distilled water to remove any residual chemicals. Pat dry with a microfiber cloth and store your pieces in a dry, soft-lined box to prevent future buildup.
Final Thoughts: Finding the Balance Between Power and Protection
The magic of ultrasonic cleaning lies in its ability to restore jewelry to its original sparkle without aggressive scrubbing or abrasive tools. But the power of ultrasonic waves needs to be balanced with the right supporting cast—especially the liquid.
Using the wrong fluid can dull, damage, or corrode fine jewelry, while the right one can make cleaning not only safe but remarkably efficient. Whether you opt for a pH-balanced professional solution or a homemade mix of distilled water and mild detergent, the key is to tailor it to the type of jewelry, understand the limitations of your cleaner, and maintain cleaning discipline over time.
Remember, ultrasonic cleaning is a tool. It magnifies your care, for better or worse. Choose your liquid wisely, and you’ll be rewarded with brilliance that endures.
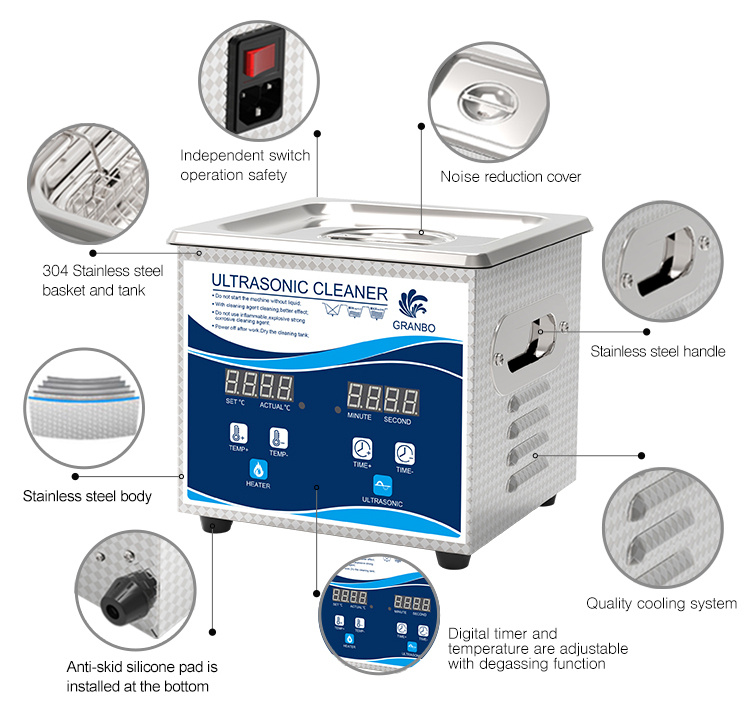
GS0101-ultrasonic cleaner
This ultrasonic cleaner makes it easy to clean items like hardware, fasteners, small metal parts – even jewelry.
It would be a nice ultrasonic cleaner for precious belongings with portable size, and digital timer heater adjustment with degassing function.
Note:
Please do not use ultrasonic to clean the pearl, it is easy to be damaged during the cleaning.
Specifications:
Model GS0101
Capacity: 1.3L
Tank size: 150×135×65 mm
Unit size: 175×165×160 mm
Ultrasonic power: 60W, 1 piece transducer
Heating power: 150W
Voltage: AC 100~120V, 60Hz; AC 220~240V, 50Hz