


How to Safely Use an Ultrasonic Jewelry Cleaner at Home
Browse Volume:155 Classify:Support
There’s a quiet joy in watching a beloved ring, dulled by years of wear, emerge from a simple water bath looking radiant again. For many people, that’s the magic of ultrasonic jewelry cleaning. But behind that magic is a science—and like all good tools, ultrasonic cleaners reward those who use them correctly.
The appeal is obvious: no more scrubbing with brushes or worrying about soaking times. Instead, a tiny tank uses sound waves to reach every crevice, lifting away grime in a matter of minutes. Yet as many first-time users quickly learn, results vary depending on what you clean, how you set it up, and what solution you use. Missteps—like tossing in glued earrings or turning up the heat too high—can lead to frustration or damage.
So, how do you get that showroom sparkle at home without risking your favorite pieces? The answer lies in understanding how ultrasonic cleaners work, what they’re best suited for, and how to use them with care. Whether you just bought your first unit or you’ve had one sitting in your cabinet, this guide will walk you through everything you need to know.
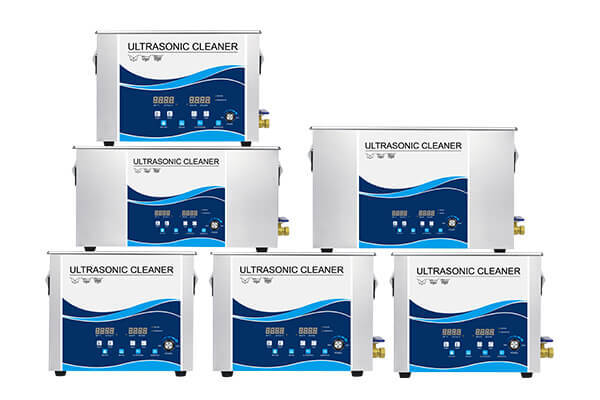
Granbo ultrasonic cleaners
The Promise of Ultrasonic Cleaning for Jewelry
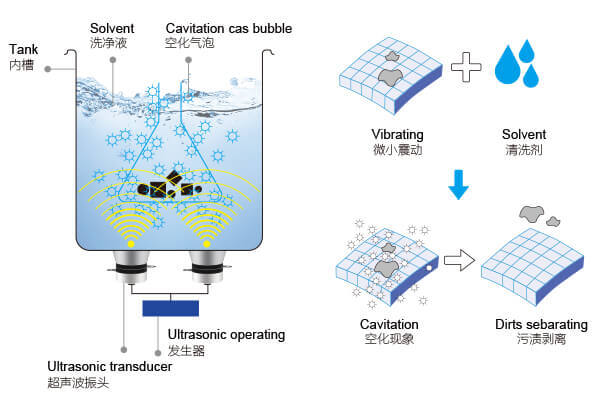
Think about all the tiny spaces where grime accumulates—underneath stone settings, inside ring bands, in the hinges of a bracelet clasp. These are areas manual cleaning rarely reaches. But ultrasonic waves, invisible to the naked eye, travel through liquid and produce microscopic bubbles that implode with force. This process, known as cavitation, gently dislodges dirt, oil, lotion residue, and even polishing compounds.
The Principle Behind Ultrasonic Cleaning
It’s no surprise that professional jewelers have used this technology for decades. What’s changed is that the same technology is now available in compact, affordable home units that fit on a bathroom counter. Brands like Granbo and Yunyisonic have made it easier than ever to access high-frequency cleaning with smart features—like digital timers, degas modes, and heat control.
Yet despite the hype, ultrasonic cleaners aren’t a magic wand. They can’t “repair” damaged pieces. They won’t remove heavy tarnish unless paired with the right solution. And some items are simply not safe to clean this way, no matter how advanced the machine. So let’s dive into the tech behind these cleaners before we tackle how to use them effectively.
Understanding the Technology: How Ultrasonic Cleaners Actually Work
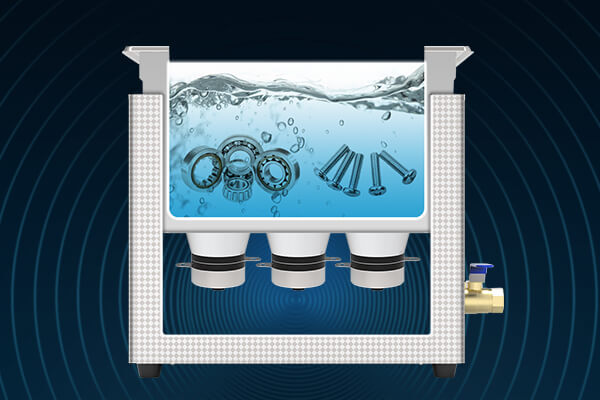
At the heart of every ultrasonic cleaner is a piezoelectric transducer that converts electrical energy into high-frequency sound waves—usually in the range of 40,000 Hz (40kHz) for jewelry. These waves pass through the liquid in the tank and generate rapid pressure changes, forming bubbles that collapse violently. That collapse is what dislodges dirt on a microscopic level, even in the tiniest of crevices.
Ultrasonic Cleaning
This is what makes ultrasonic cleaning so effective—and so delicate. The process is powerful enough to lift grime from prongs around a diamond but gentle enough not to scratch gold or platinum. However, because cavitation depends on water, temperature, and solution chemistry, skipping the setup process can reduce effectiveness.
That’s why the cleaning solution you use—not just water—is critical. Plain water has surface tension and viscosity that limit bubble formation. Most users will get better results with a cleaning agent formulated for jewelry, especially if their items have body oils, metal oxide, or polishing residue.
Even temperature matters. Warmer water (around 30–50°C or 86–122°F) improves cavitation, but too much heat can loosen adhesives or damage delicate stones.
Choosing the Right Jewelry for Ultrasonic Cleaning
Before you hit the “on” switch, it’s worth taking a moment to examine what exactly you plan to clean. Not all jewelry benefits from ultrasonic cleaning—some pieces can be damaged, while others will come out gleaming like new. Knowing the difference can save you from heartbreak and help you use your ultrasonic cleaner like a pro.
Let’s start with the safe bets. Solid metals like gold, platinum, and stainless steel are usually good candidates. Hard gemstones such as diamonds, rubies, and sapphires (especially those set in sturdy mountings) also handle ultrasonic cleaning well. Their dense structure and durable surfaces can tolerate the cavitation process without issue.
But caution is critical for certain stones. Soft or porous gems—like emeralds, opals, turquoise, lapis lazuli, and amber—are often too delicate for ultrasonic treatment. Many of these stones are prone to internal cracking or contain natural inclusions that can expand under heat or pressure. The Gemological Institute of America (GIA) advises against cleaning these materials ultrasonically unless verified as untreated and structurally stable.
Pay attention to how the jewelry is constructed, too. Glues, resins, and enamel finishes don’t always hold up well in an ultrasonic bath. You might not notice damage immediately, but adhesives can degrade over time, and enamel can develop microscopic fractures. Antique or costume jewelry often falls into this category—beautiful, but not built for intense cleaning methods.
So if you’re unsure, check the jewelry’s origin, material composition, and setting method. When in doubt, consult a professional or use a gentler cleaning method. A simple rule: if a jeweler wouldn’t risk putting it in their own ultrasonic machine, neither should you.
Preparing Your Cleaning Station: What You’ll Need
Using an ultrasonic cleaner isn’t complicated, but it helps to approach it with a bit of prep and respect. Treat it like preparing for a mini science experiment—you’re combining fluid dynamics, sound waves, heat, and valuable personal items. Having the right setup is half the battle.
Here’s what your cleaning station should include:
- Your ultrasonic jewelry cleaner, preferably with adjustable time and temperature settings
- A suitable cleaning solution—either commercial jewelry-specific fluid or a mild, pH-neutral mixture compatible with your items
- Distilled or deionized water (tap water can leave mineral spots and reduce cleaning efficiency)
- A basket or mesh tray to suspend items without touching the tank bottom
- A lint-free cloth or soft microfiber towel for drying afterward
- Tweezers or gloves to remove items (especially if the water is warm)
- Optional: a magnifier for inspecting results up close
Place your cleaner on a flat, stable surface with good ventilation. Avoid surrounding the machine with clutter. If you’re using a heated model, ensure the area is away from small children or pets.
And yes—keep the manual nearby. Not all ultrasonic cleaners work the same way. Some have “degas” functions, some allow for pulse cleaning, others have presets. Knowing your machine’s features will help you avoid common errors.
Step-by-Step Guide to Using an Ultrasonic Jewelry Cleaner
Once you’ve picked the right jewelry and set up your station, the actual cleaning process is straightforward—but every step matters. Done correctly, you’ll get results that rival professional cleaning. Rushed or sloppy use, however, could reduce results or, worse, damage what you’re trying to protect.
Let’s walk through it:
Step 1: Fill the Tank
Start by filling the tank with distilled water. Most units have a fill line—stick to it. Avoid tap water if possible, especially in hard water areas. The minerals can interfere with cavitation and leave deposits on jewelry.
Step 2: Add the Cleaning Solution
Mix in your cleaning solution based on the manufacturer’s recommendation. This usually ranges from a 1:10 to 1:20 ratio (cleaner to water), depending on the concentration and the soil level on your jewelry. Stir gently if needed.
Step 3: Degas the Liquid
Some units include a degas mode, but if yours doesn’t, just let it run for 3–5 minutes before inserting jewelry. This helps release trapped air in the water, which would otherwise dampen cavitation.
Step 4: Load the Jewelry Properly
Place your jewelry in the basket or tray. Do not let items touch the bottom of the tank, as that can block ultrasonic waves and increase vibration risk. If cleaning multiple pieces, space them out—overcrowding leads to poor cleaning.
Step 5: Set the Time and Temperature
For most jewelry, 2–5 minutes is sufficient. Set the temperature between 30°C to 50°C (86°F to 122°F). Higher temperatures improve performance but can risk damage to glue or softer stones.
Step 6: Start Cleaning
Press start and let the machine run. You’ll often see small bubbles forming around your jewelry—that’s cavitation at work. Avoid peeking or opening the lid during operation.
Step 7: Rinse and Dry
Once the cycle finishes, remove the jewelry carefully. Rinse it under clean distilled water to remove any residual solution, then pat dry with a soft cloth. Inspect your pieces under light—you’ll likely see a dramatic difference.
If needed, you can run a second short cycle, but don’t exceed 10 minutes total without checking manufacturer guidance.
Common Mistakes to Avoid When Using Ultrasonic Jewelry Cleaners
Even the most advanced ultrasonic cleaner won’t compensate for user error. While the process itself is simple, there are a few surprisingly common mistakes that can lead to disappointing results—or worse, irreversible damage. Here’s how to avoid them.
Mistake 1: Cleaning the Wrong Items
As mentioned earlier, not all jewelry is safe for ultrasonic cleaning. One of the most frequent causes of damage is putting in porous, heat-sensitive, or fracture-filled stones like emeralds, pearls, or opals. Even if the piece looks fine after the first run, cumulative micro-damage can occur, especially if adhesive or treated coatings are involved. Always double-check your jewelry type before dropping it in the bath.
Mistake 2: Using the Wrong Solution
It’s tempting to grab dish soap or household cleaners and pour them into the tank. Don’t. Many of these products contain harsh chemicals, surfactants, or abrasives that aren’t designed for cavitation or delicate metals. Acidic or alkaline extremes can corrode settings or cloud stones. Stick with professionally formulated cleaning solutions—or at least very mild, pH-balanced alternatives that are proven safe for jewelry use.
Mistake 3: Skipping Degassing or Overloading the Tank
Skipping the degas cycle leaves microscopic air bubbles in the liquid that absorb the ultrasonic energy instead of transmitting it to your items. Likewise, crowding the basket with too many items prevents even cleaning and can cause pieces to knock into each other. Both habits reduce the effectiveness of the clean and increase risk of scratches or uneven results.
Mistake 4: Excessive Cleaning Time or Temperature
More isn’t always better. Ultrasonic cavitation is powerful enough to clean quickly; extending the cleaning time can weaken soldered joints or affect adhesives. Likewise, overheating the tank—especially above 50°C (122°F)—can warp some components or cloud certain gemstones. Use moderation and follow your machine’s guidance.
Mistake 5: Ignoring Rinse and Drying Protocols
Even with distilled water and a good solution, residue can be left behind after the cycle. If not rinsed thoroughly and dried properly, that residue can attract dirt, interfere with shine, or lead to long-term corrosion. Always rinse in clean distilled water and dry with a soft, lint-free cloth.
Avoiding these errors turns your ultrasonic jewelry cleaner from a high-tech gimmick into a tool you trust for years.
Maintenance Tips for Long-Term Performance
Like any appliance, your ultrasonic jewelry cleaner needs some TLC to keep working at its best. Regular maintenance not only extends the life of your device but also ensures each cleaning session delivers consistent results.
Drain and Change the Solution Frequently
It’s easy to forget, especially if the water still looks clear—but ultrasonic cleaning doesn’t just remove surface dirt. It suspends tiny particles in the water, many of which are invisible to the naked eye. These particles absorb ultrasonic energy, reducing cleaning power. If you clean frequently, change your solution daily or after every few sessions.
Clean the Tank Gently but Thoroughly
Avoid using abrasive tools or harsh chemicals. A soft sponge and warm water are often enough to wipe away any remaining debris. If buildup occurs (especially from hard water), use a mild vinegar solution followed by a clean water rinse. Always dry the tank fully after cleaning.
Inspect Your Basket and Lid
Over time, the basket or mesh tray may collect grime or lose shape. Replace if bent or if fine debris builds up in corners. The lid should fit securely to minimize splashing and reduce noise during operation.
Let the Machine Cool Between Long Sessions
If you’re running multiple cycles back-to-back—especially with heated units—allow the device to cool down periodically. This helps protect the transducers and prevents overheating of the circuit board.
Store in a Dust-Free, Dry Location
When not in use, cover your unit or place it in a cabinet. Dust can interfere with control panels or vents, and humidity can lead to premature wear.
By treating your cleaner well, you can rely on it not just for jewelry, but for glasses, watches, razors, and other delicate items too.
Real-World Results: What People Say About Their Ultrasonic Jewelry Cleaners
Ultrasonic jewelry cleaners often fall into the category of “didn’t know I needed it until I had it.” That’s because the visual results can be unexpectedly dramatic.
One verified reviewer on a major retailer platform wrote:
“I thought my diamond ring was clean. But when I looked in the tank after a 3-minute cycle, the water was brown. And my ring was sparkling like the day I got it.”
Another comment on a jewelry subreddit said:
“I used to scrub my gold necklace with a brush every month. Now I just toss it in the ultrasonic cleaner and forget it. It’s way gentler and works better.”
However, not every review is glowing—and that’s important to note. Some users share frustration when cleaning silver-plated items (which don’t respond as well as solid silver), or confusion when tarnish doesn’t fully disappear. These aren’t flaws in the machine—it’s usually about choosing the wrong item or expecting more than ultrasonic technology is designed to do.
But for those who follow the guidance—right solution, right material, right settings—the results speak for themselves. Clean, brilliant, professional-looking jewelry, all without leaving your home.